
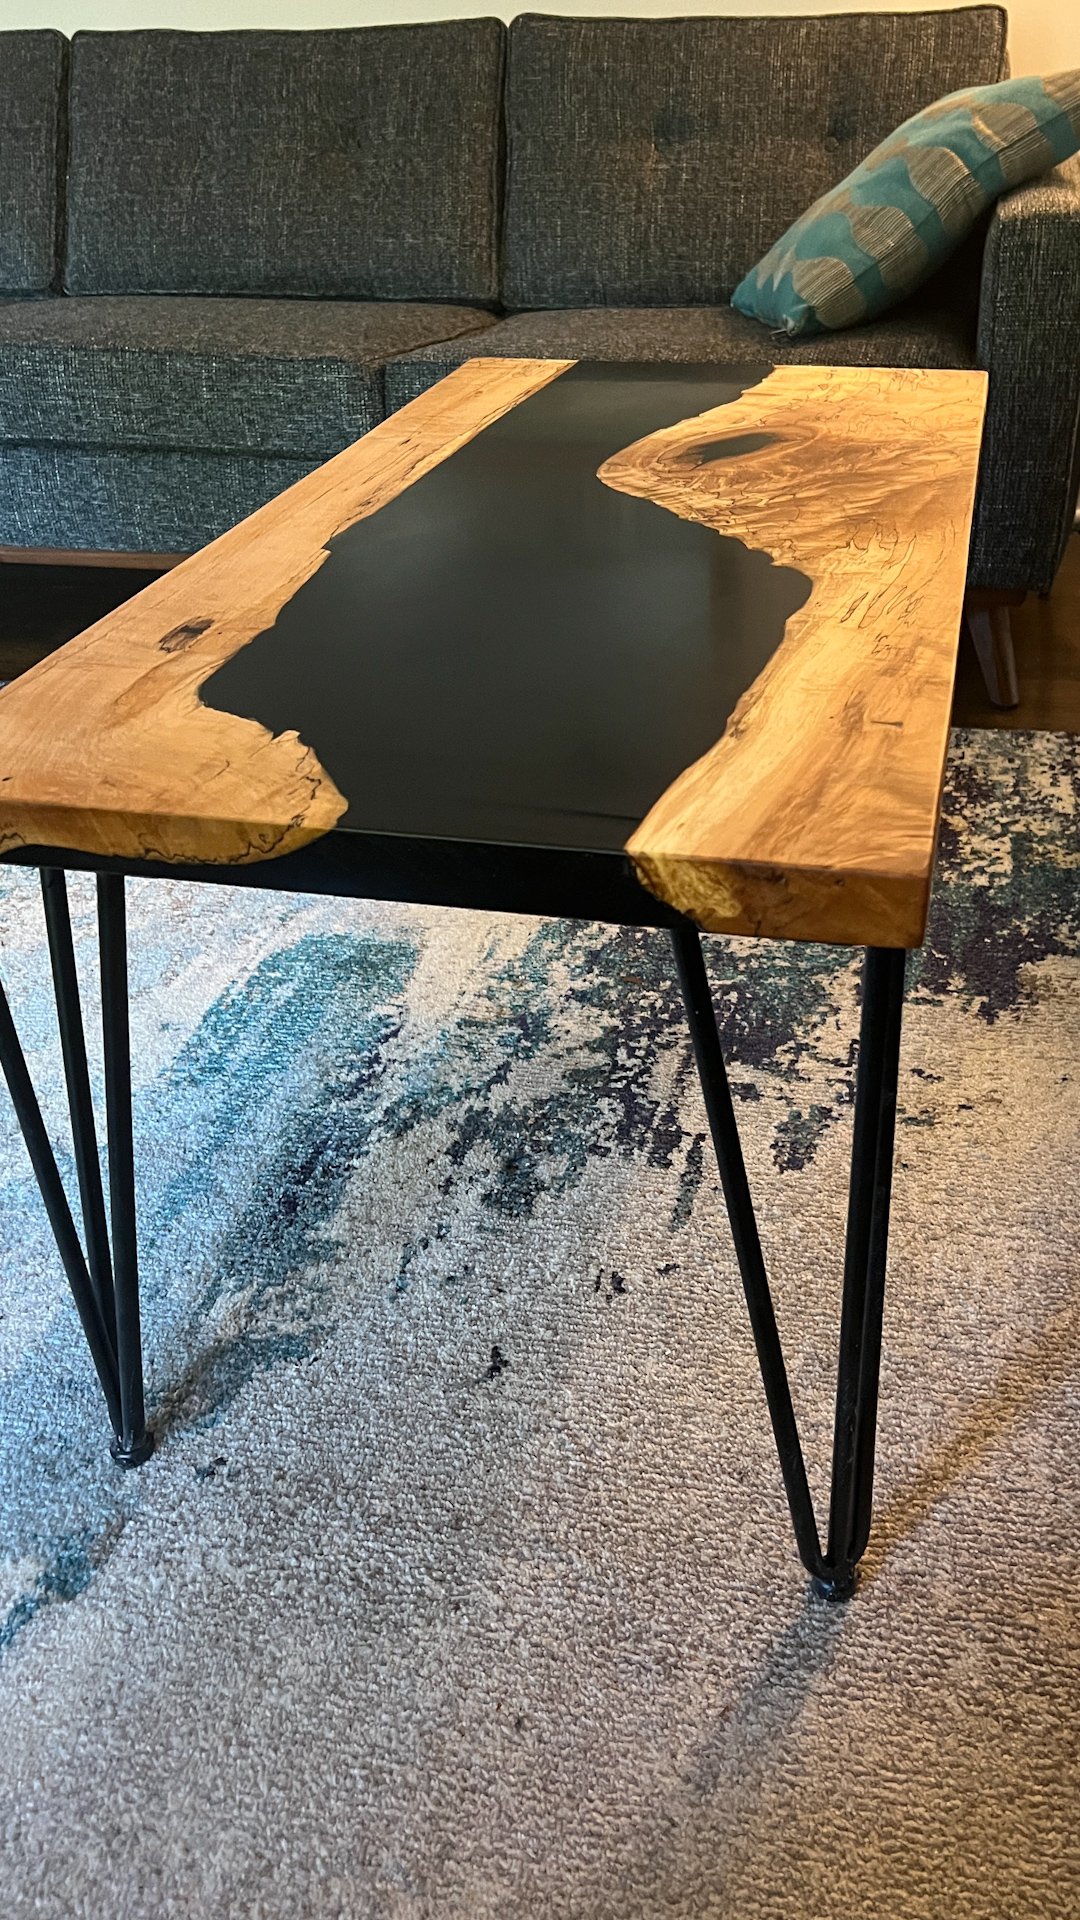
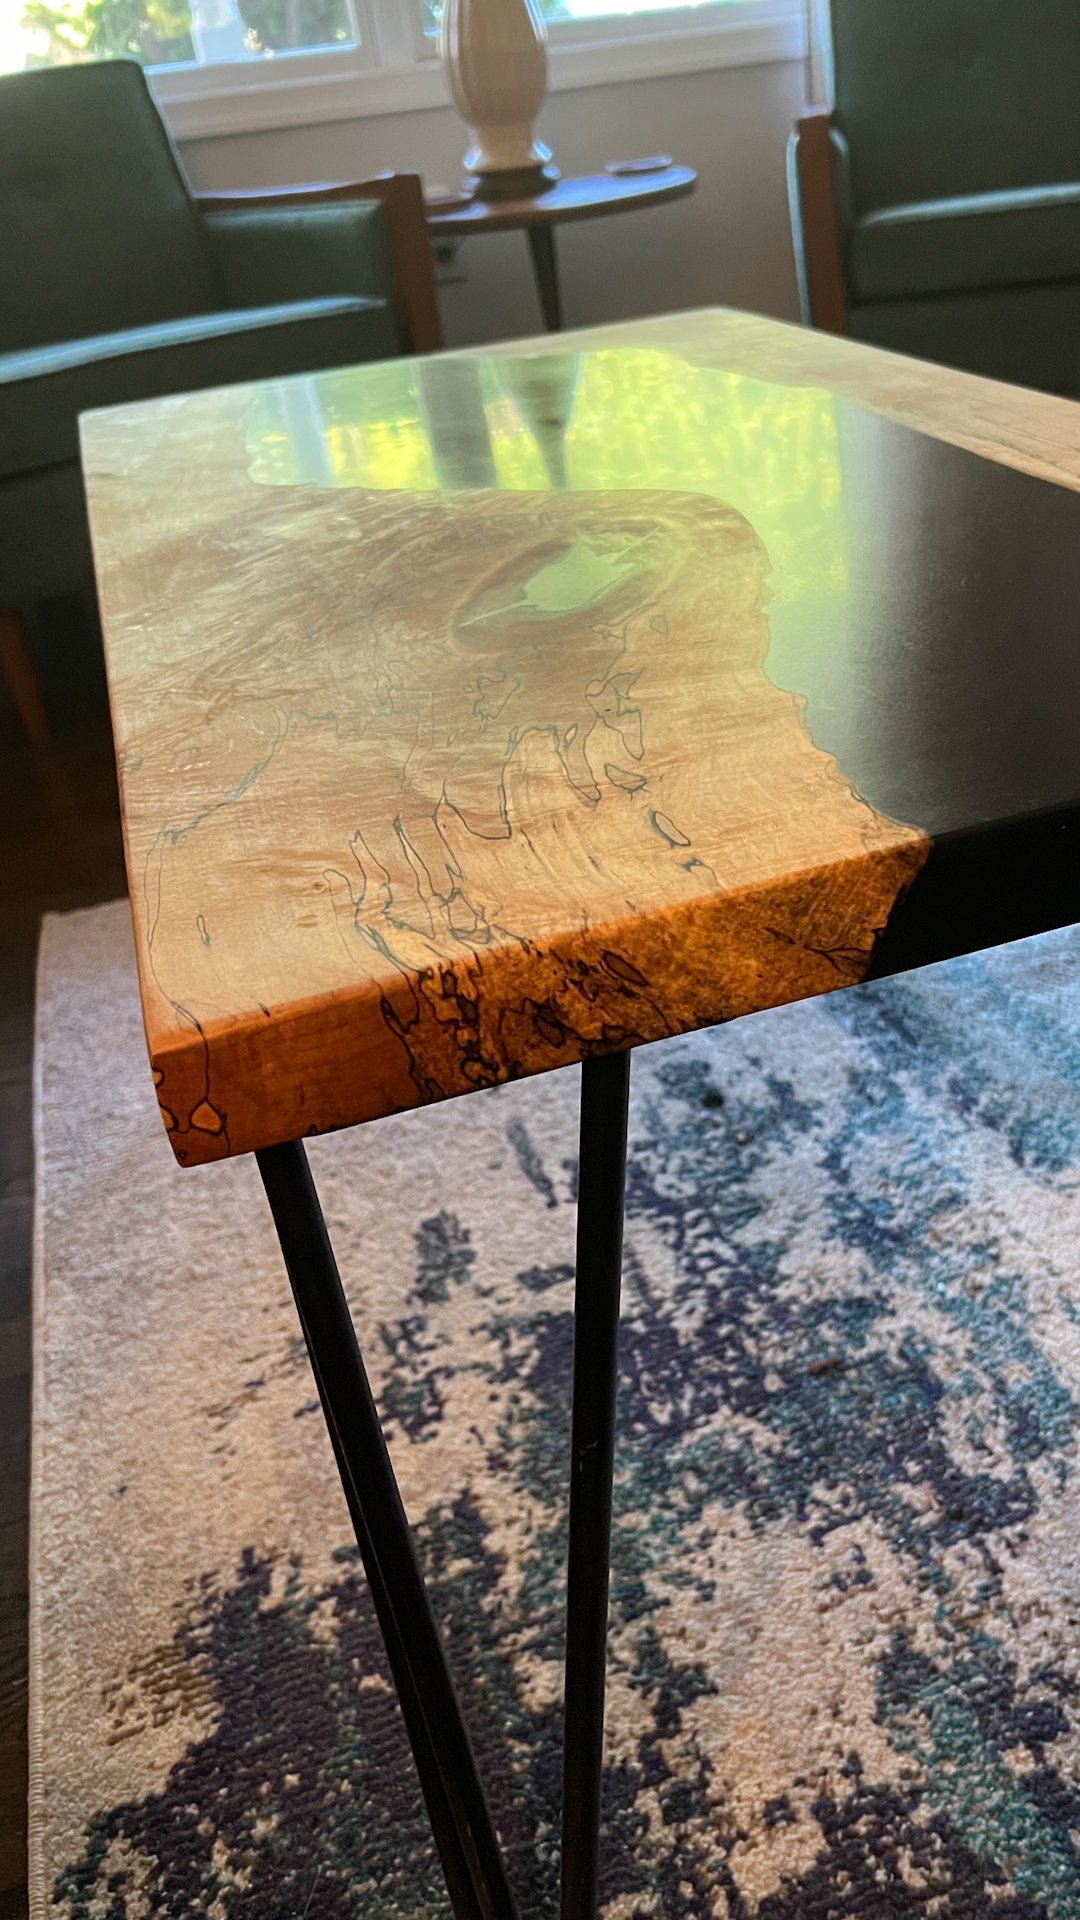
Handcrafted Epoxy River Table
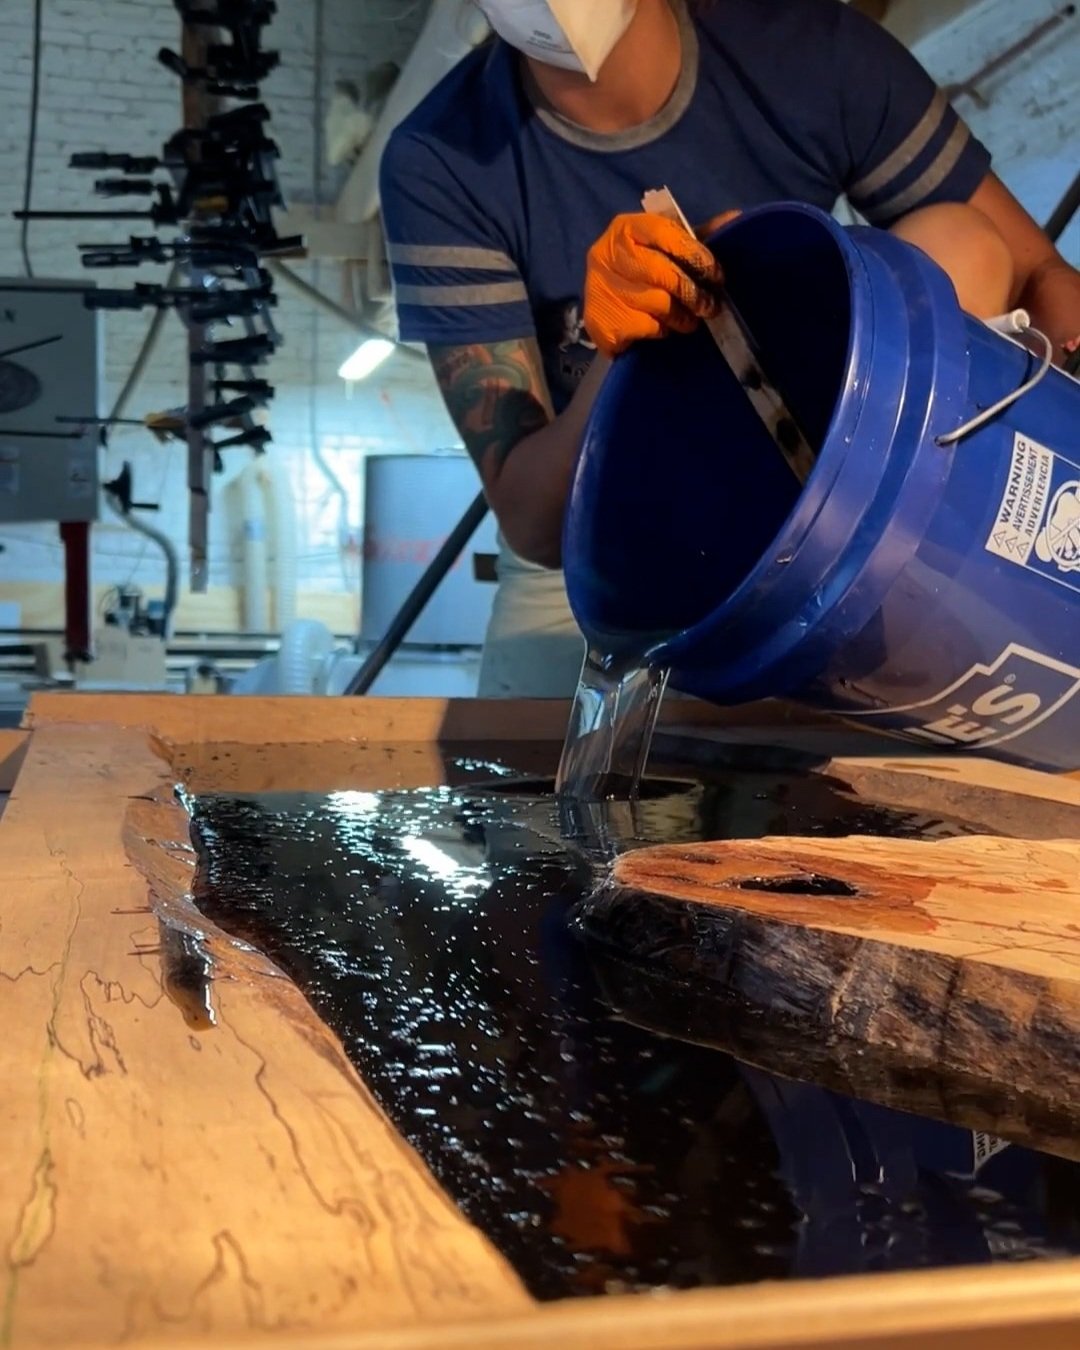
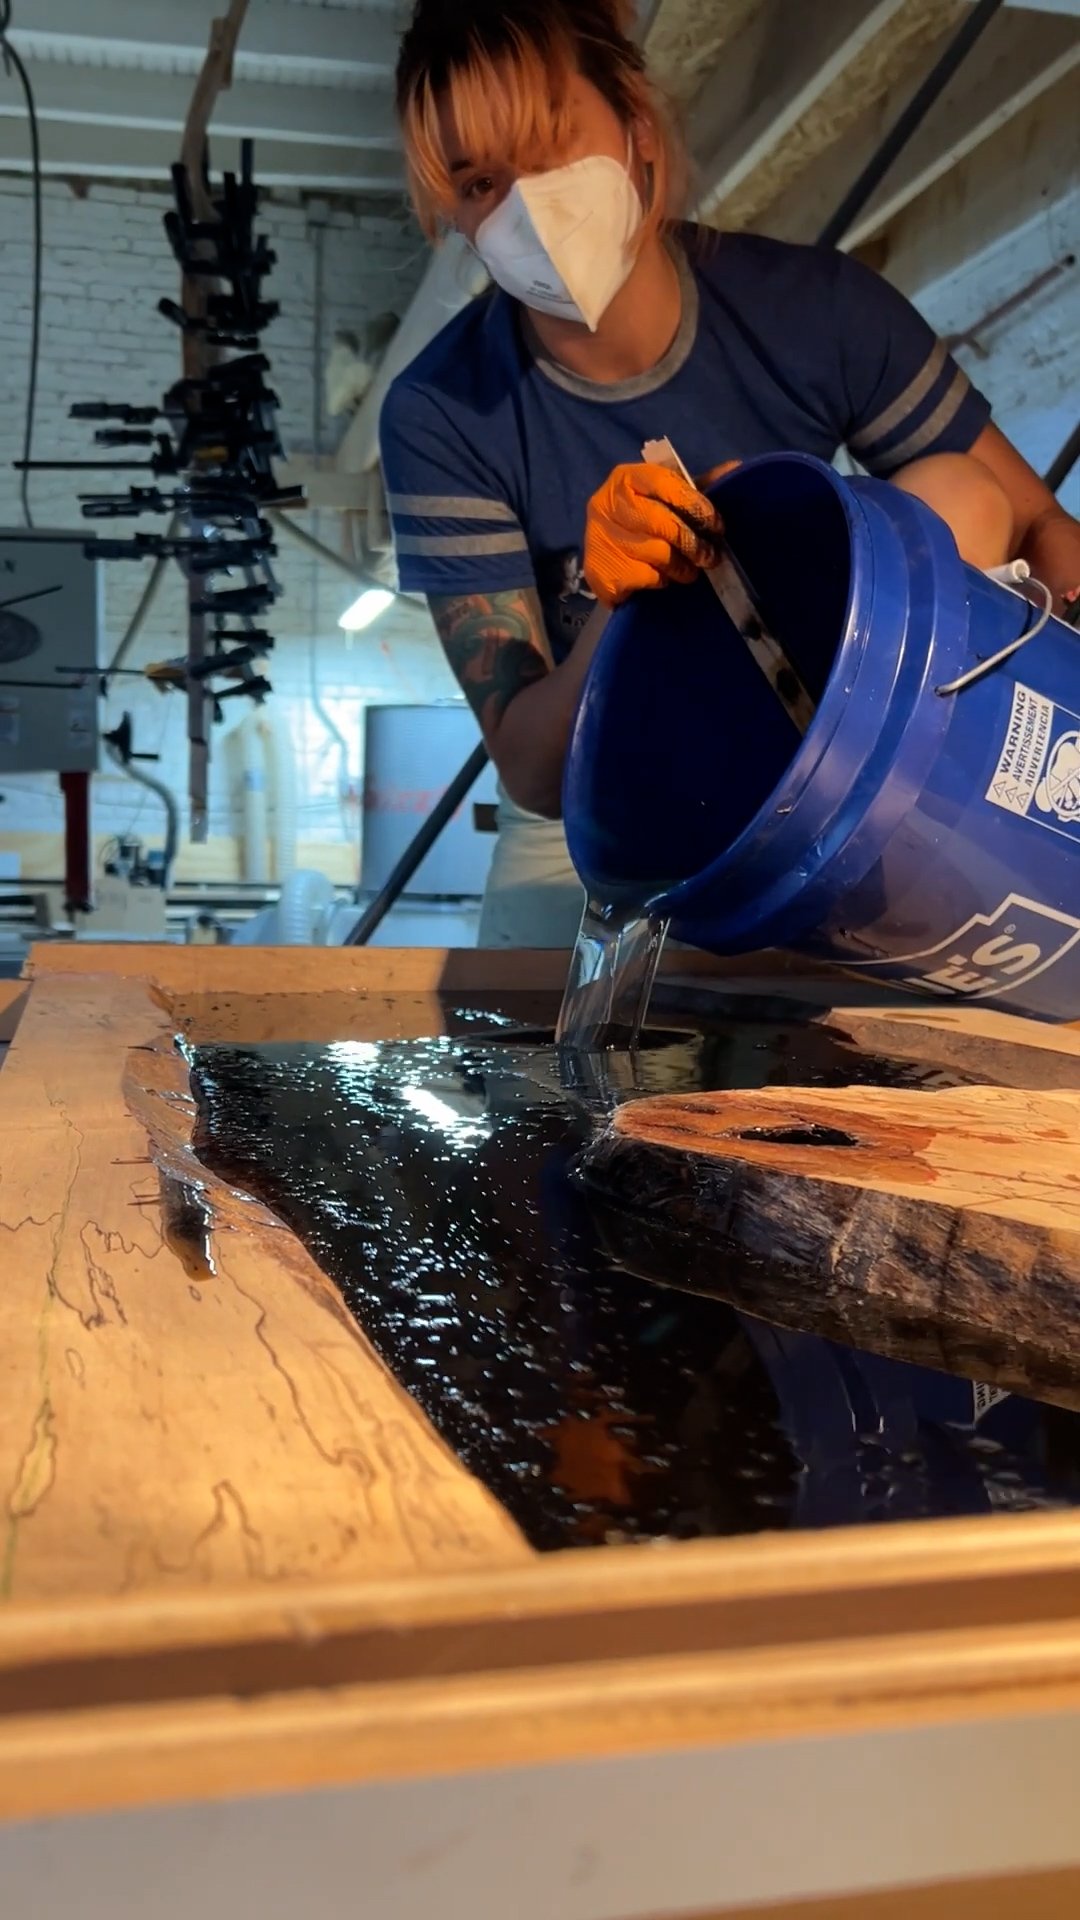
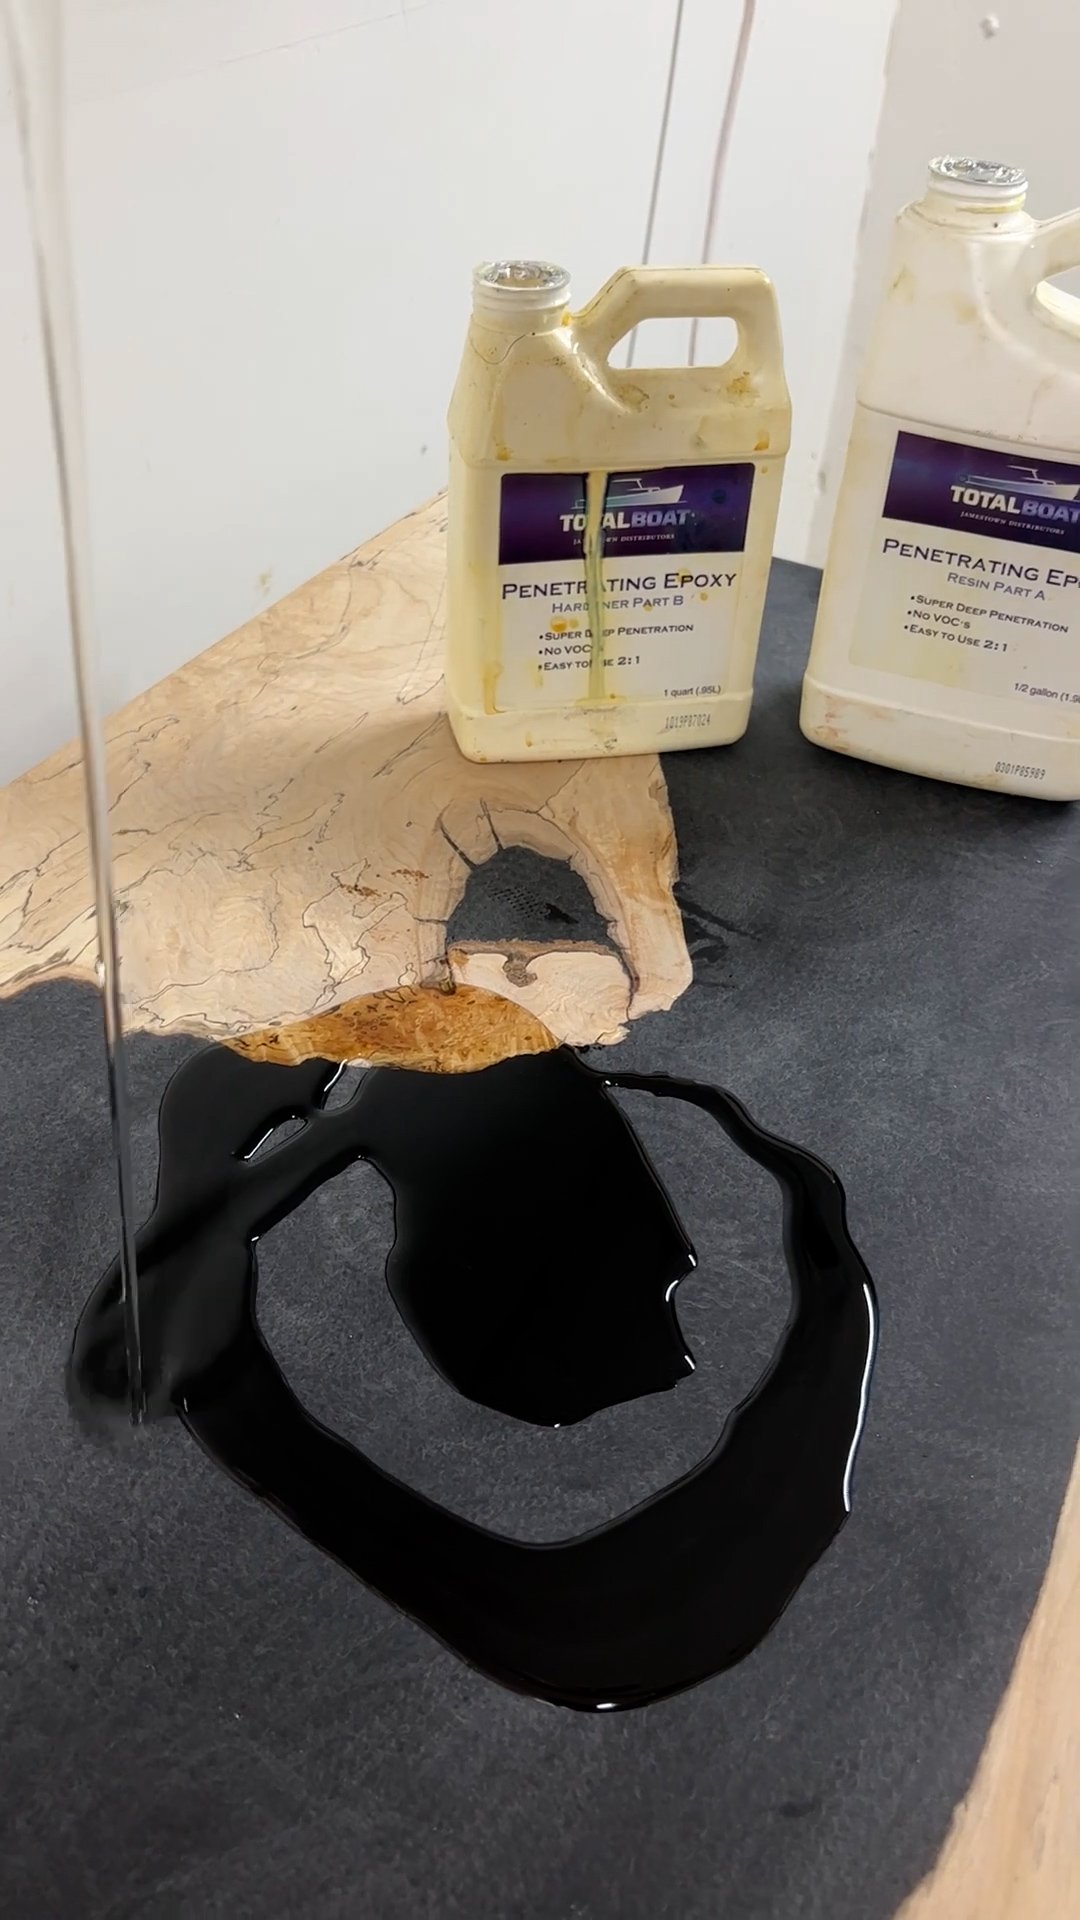
Welcome once again to the Wayward Wood Shop. While we would usually be focusing on our handcrafted wood landing nets for fly-fishing, the latest project we’ve been working on is an Epoxy River Table that we made for a client in Pennsylvania. This Epoxy River Table was made with Total Boat Fathom Deep Pour Epoxy. Also, I decided to tint it with Total Boat Pigment dispersion in Black, which will give it a nice, rich, dark coloring.
Welcome once again to the Wayward Wood Shop. While we would usually be focusing on our handcrafted wood landing nets, the latest project we’ve been working on is an Epoxy River Table that we made for a client in Pennsylvania. This Epoxy River Table was made with Total Boat Fathom Deep Pour Epoxy. Also, I decided to tint it with Total Boat Pigment dispersion in Black, which will give it a nice, rich, dark coloring.
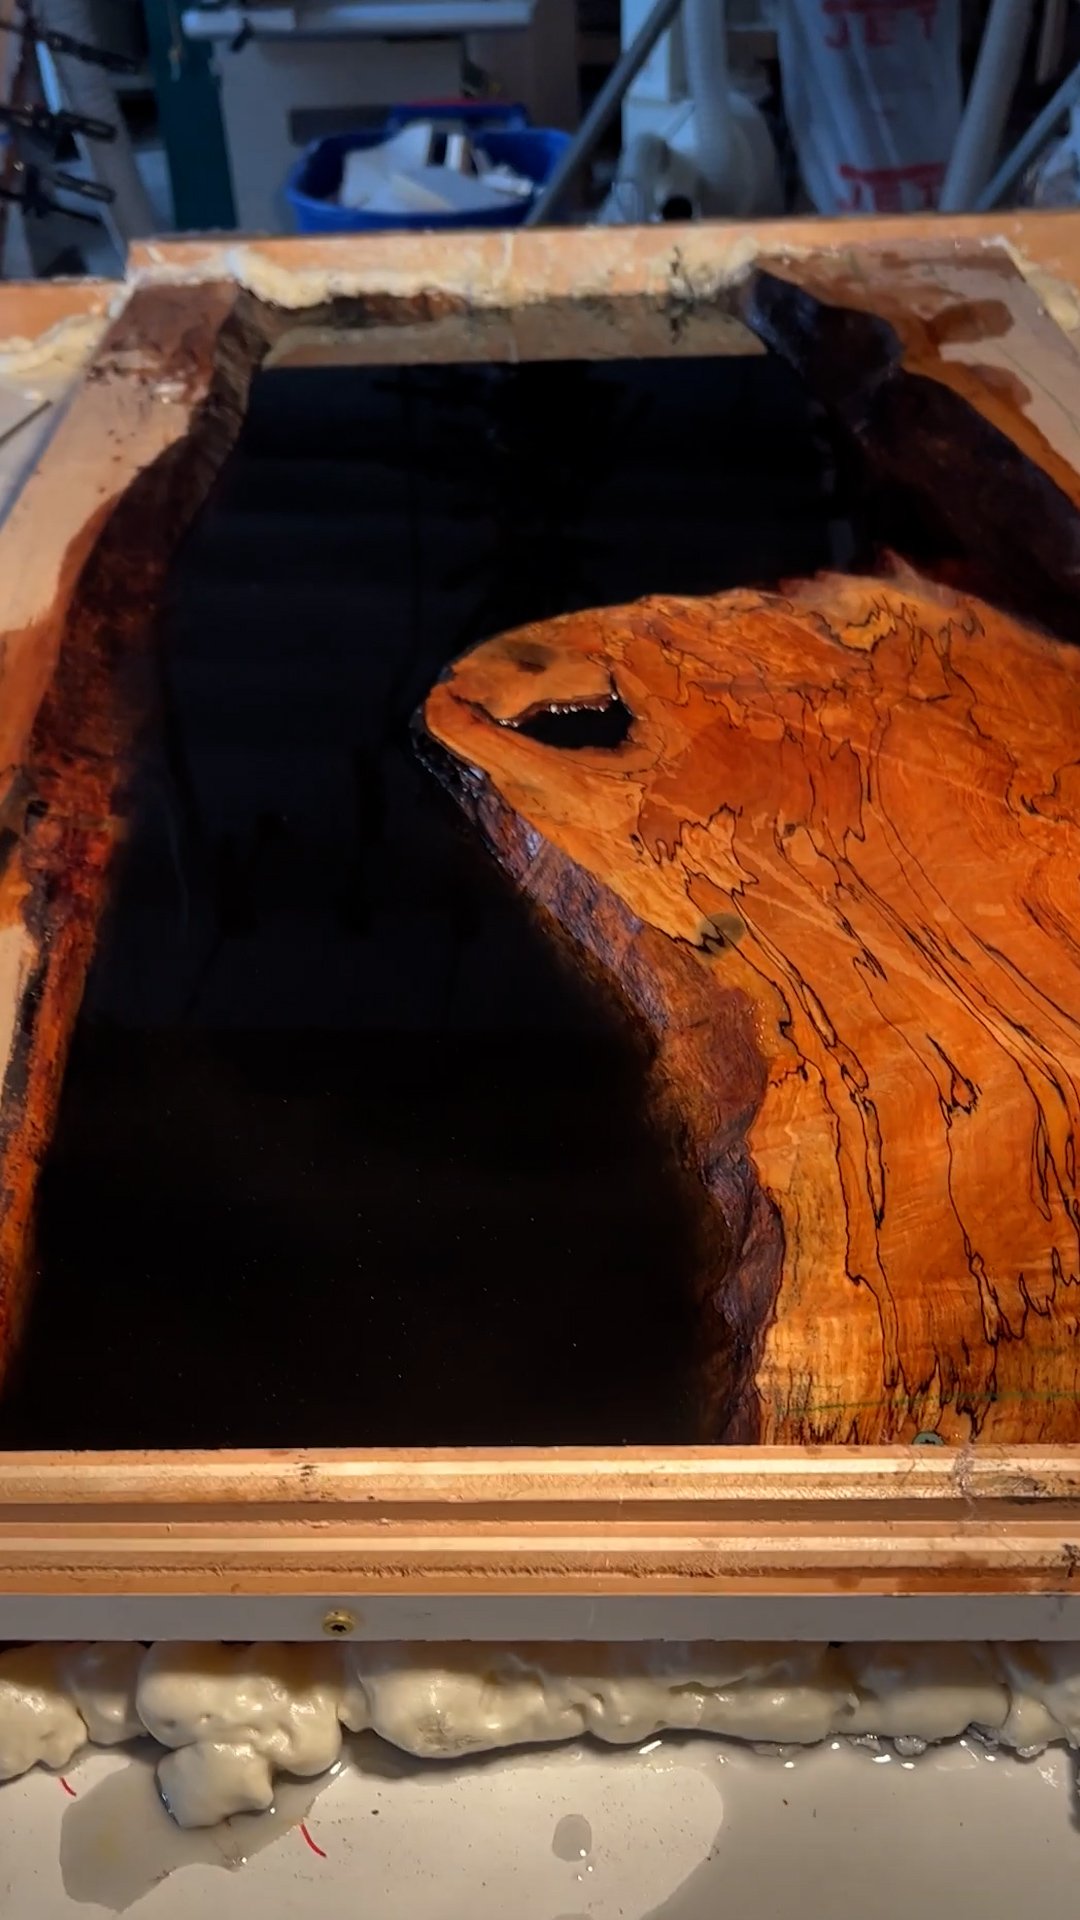
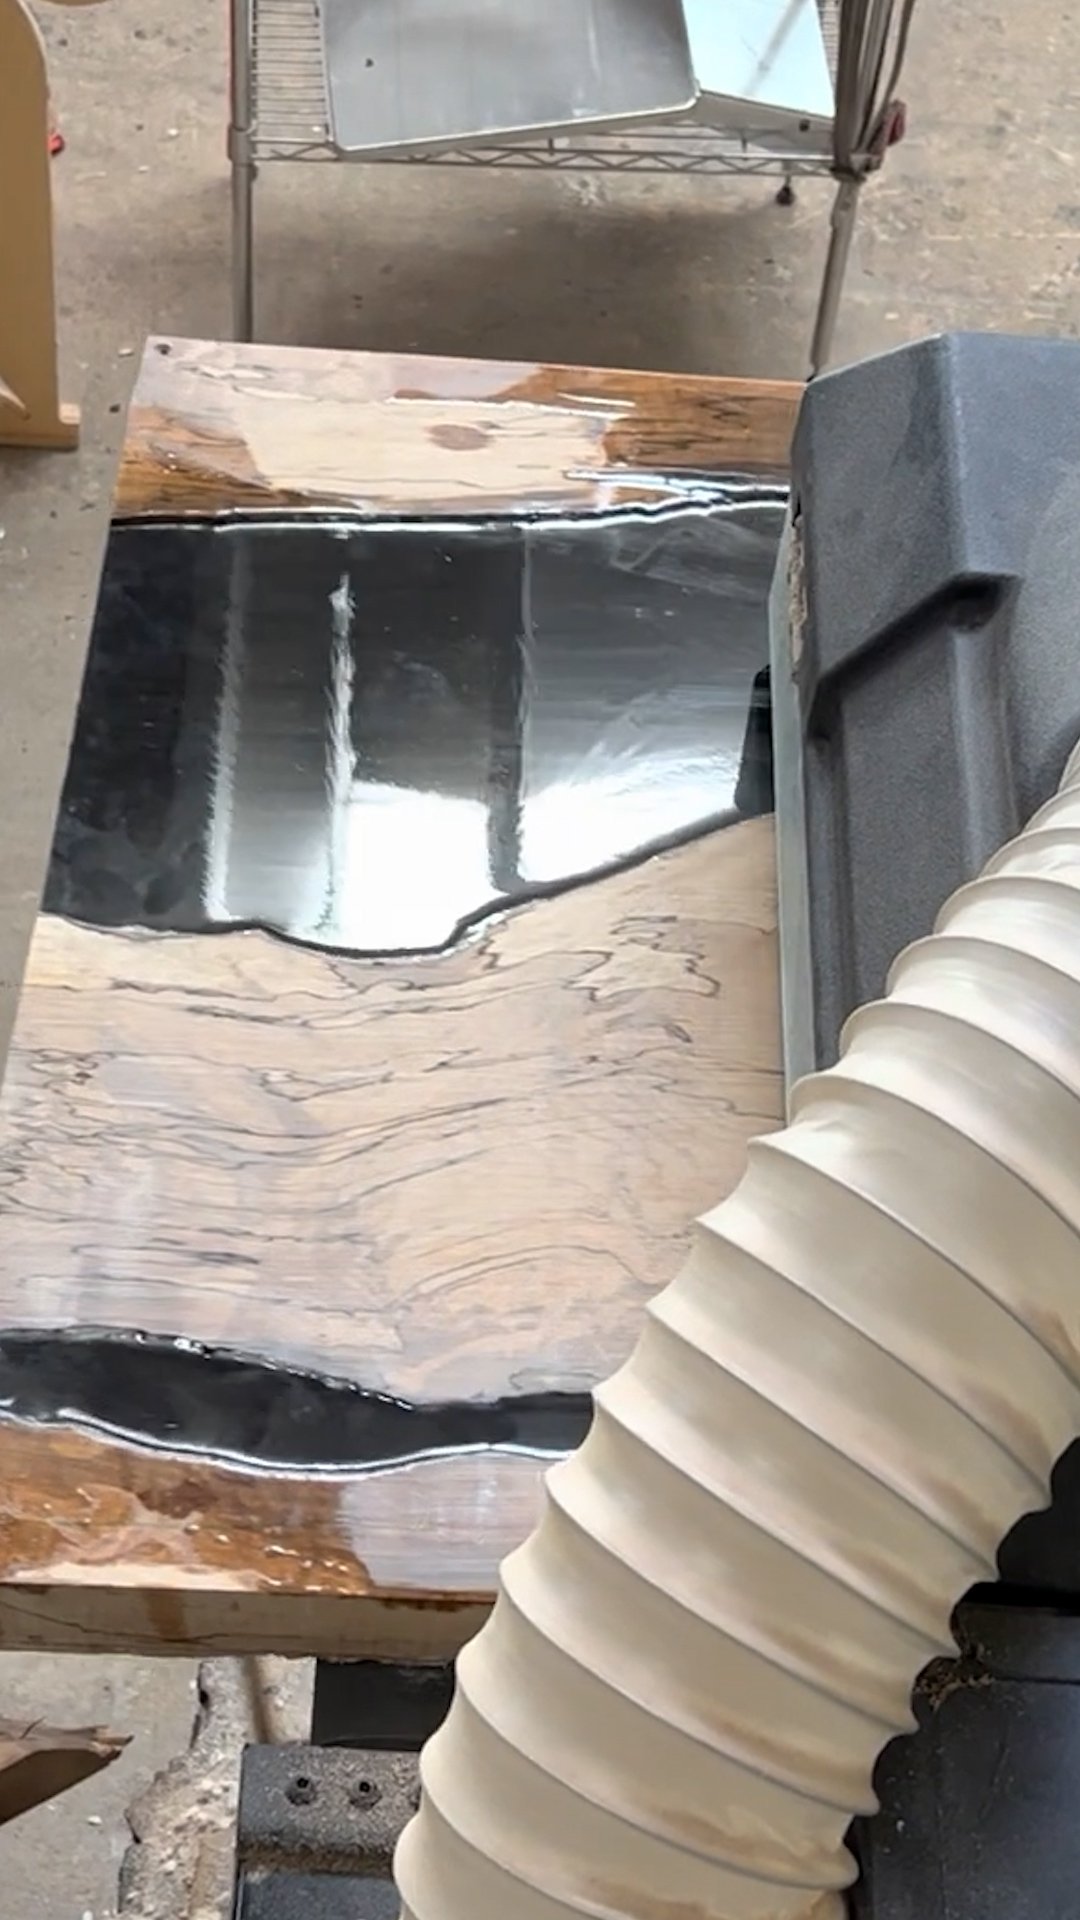
I mixed the Epoxy and Pigment Dispersion, and I began to pour between the wooden pieces, filling it to the brim and letting it settle. At this point, I broke out my torch to get rid of any bubbles, giving it a nice, clean, even look across the top of the table. The wood used in this particular project is actually locally sourced Spalted Maple, similar to some of our custom wooden fly-fishing nets that we make. After hours resting under the heat lamp, we allowed the epoxy to cure.
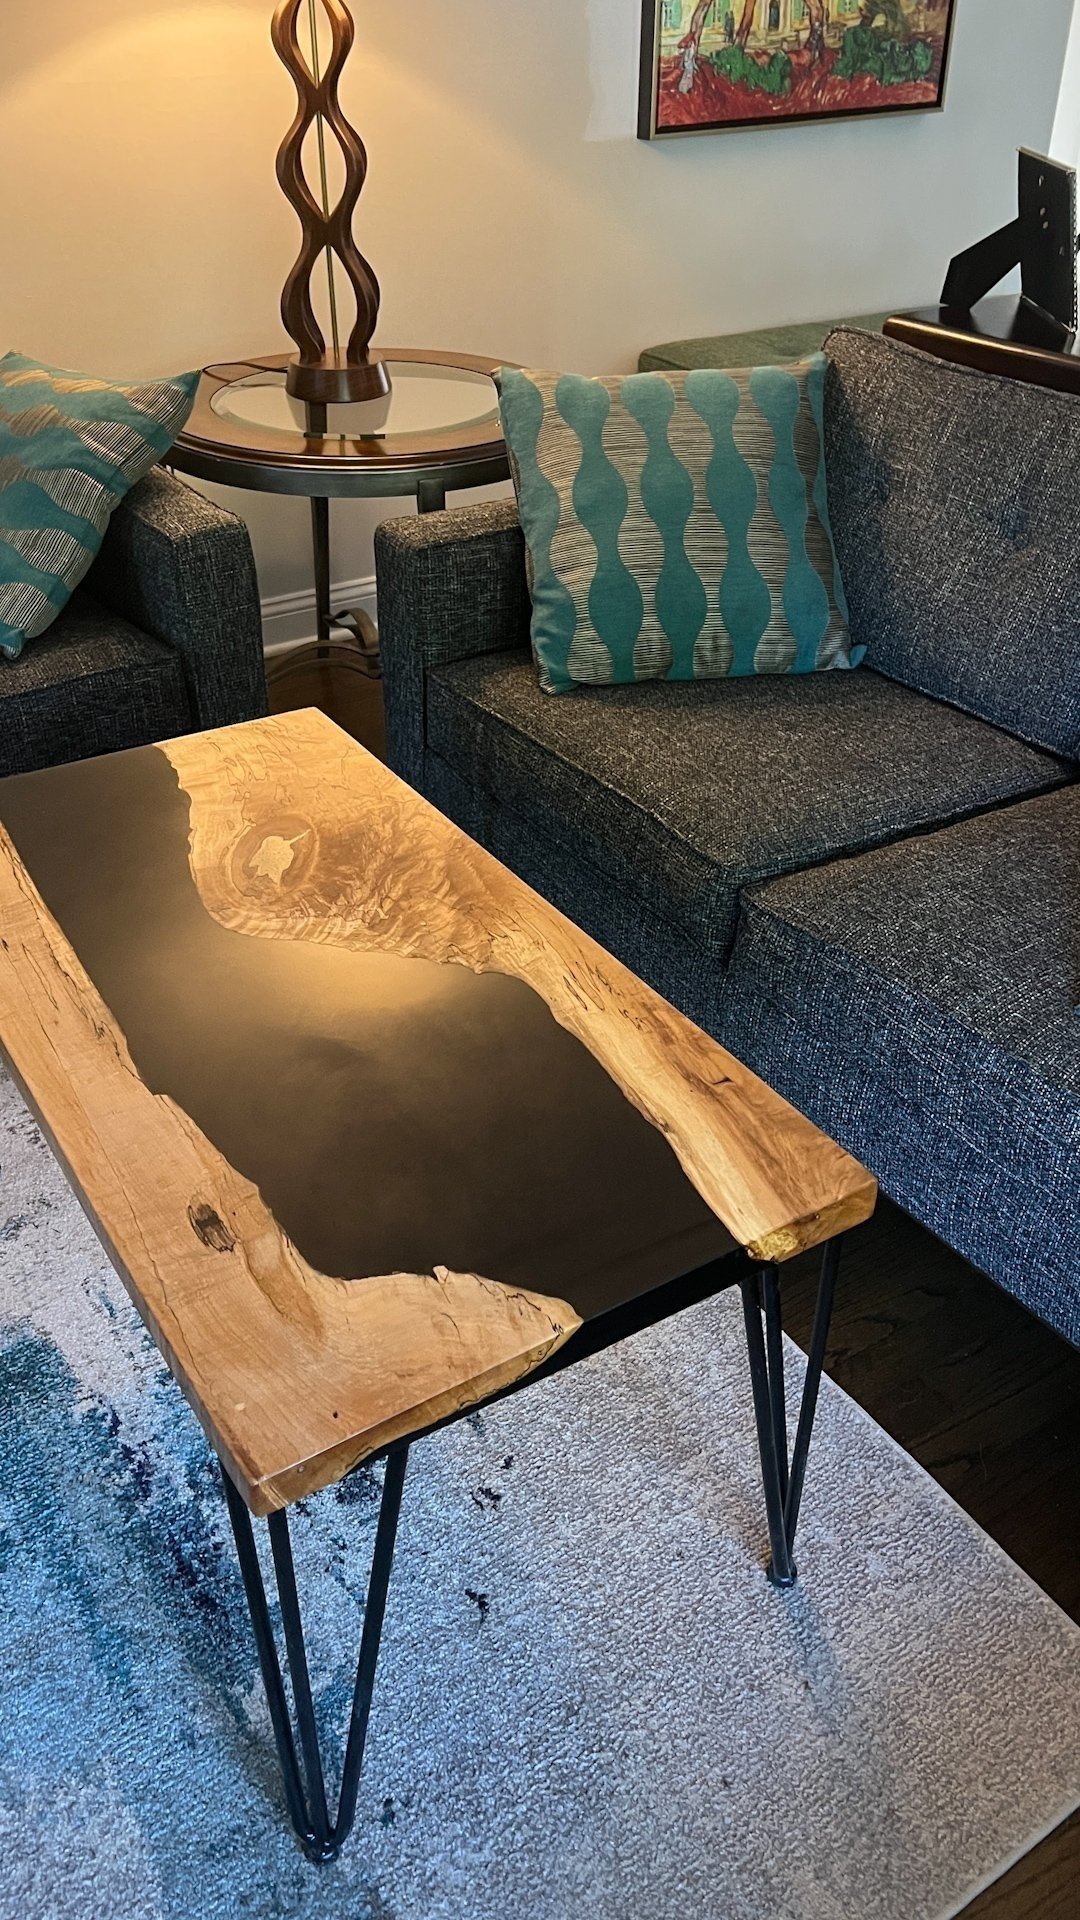
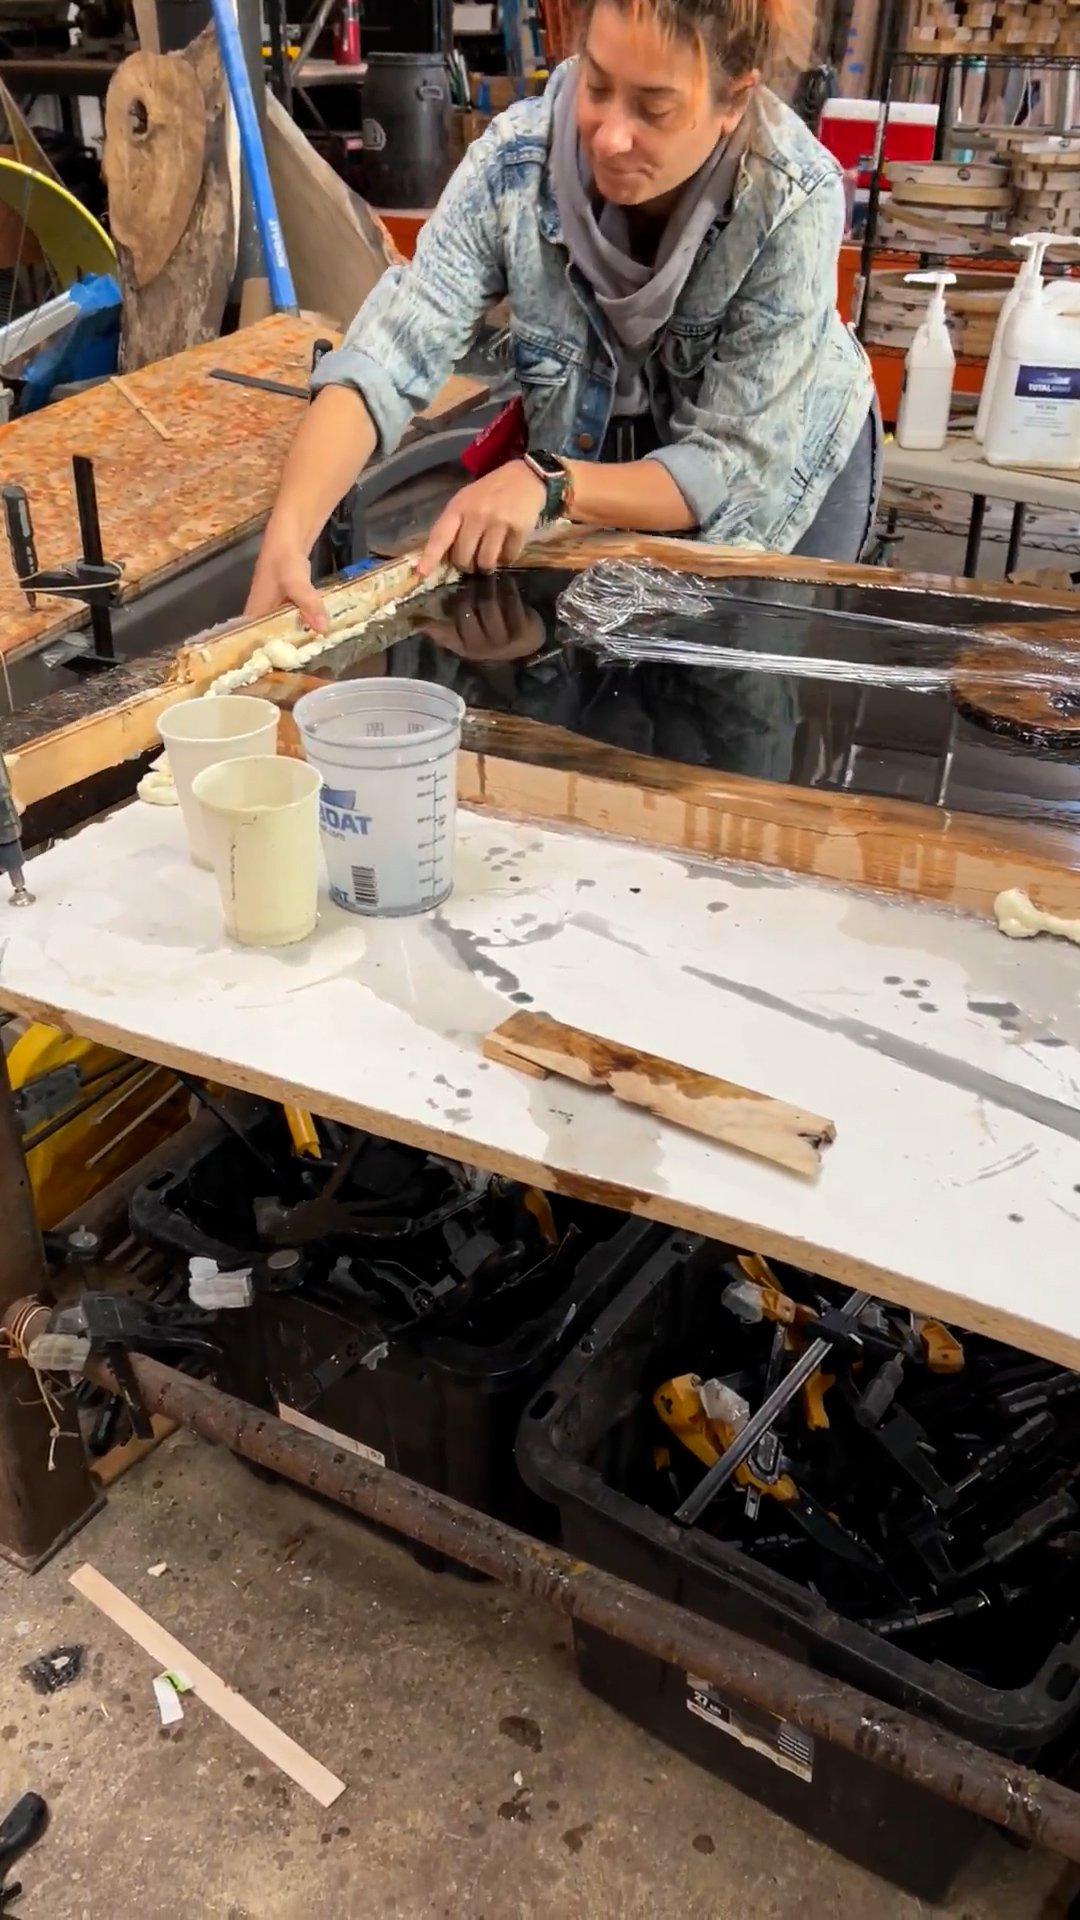
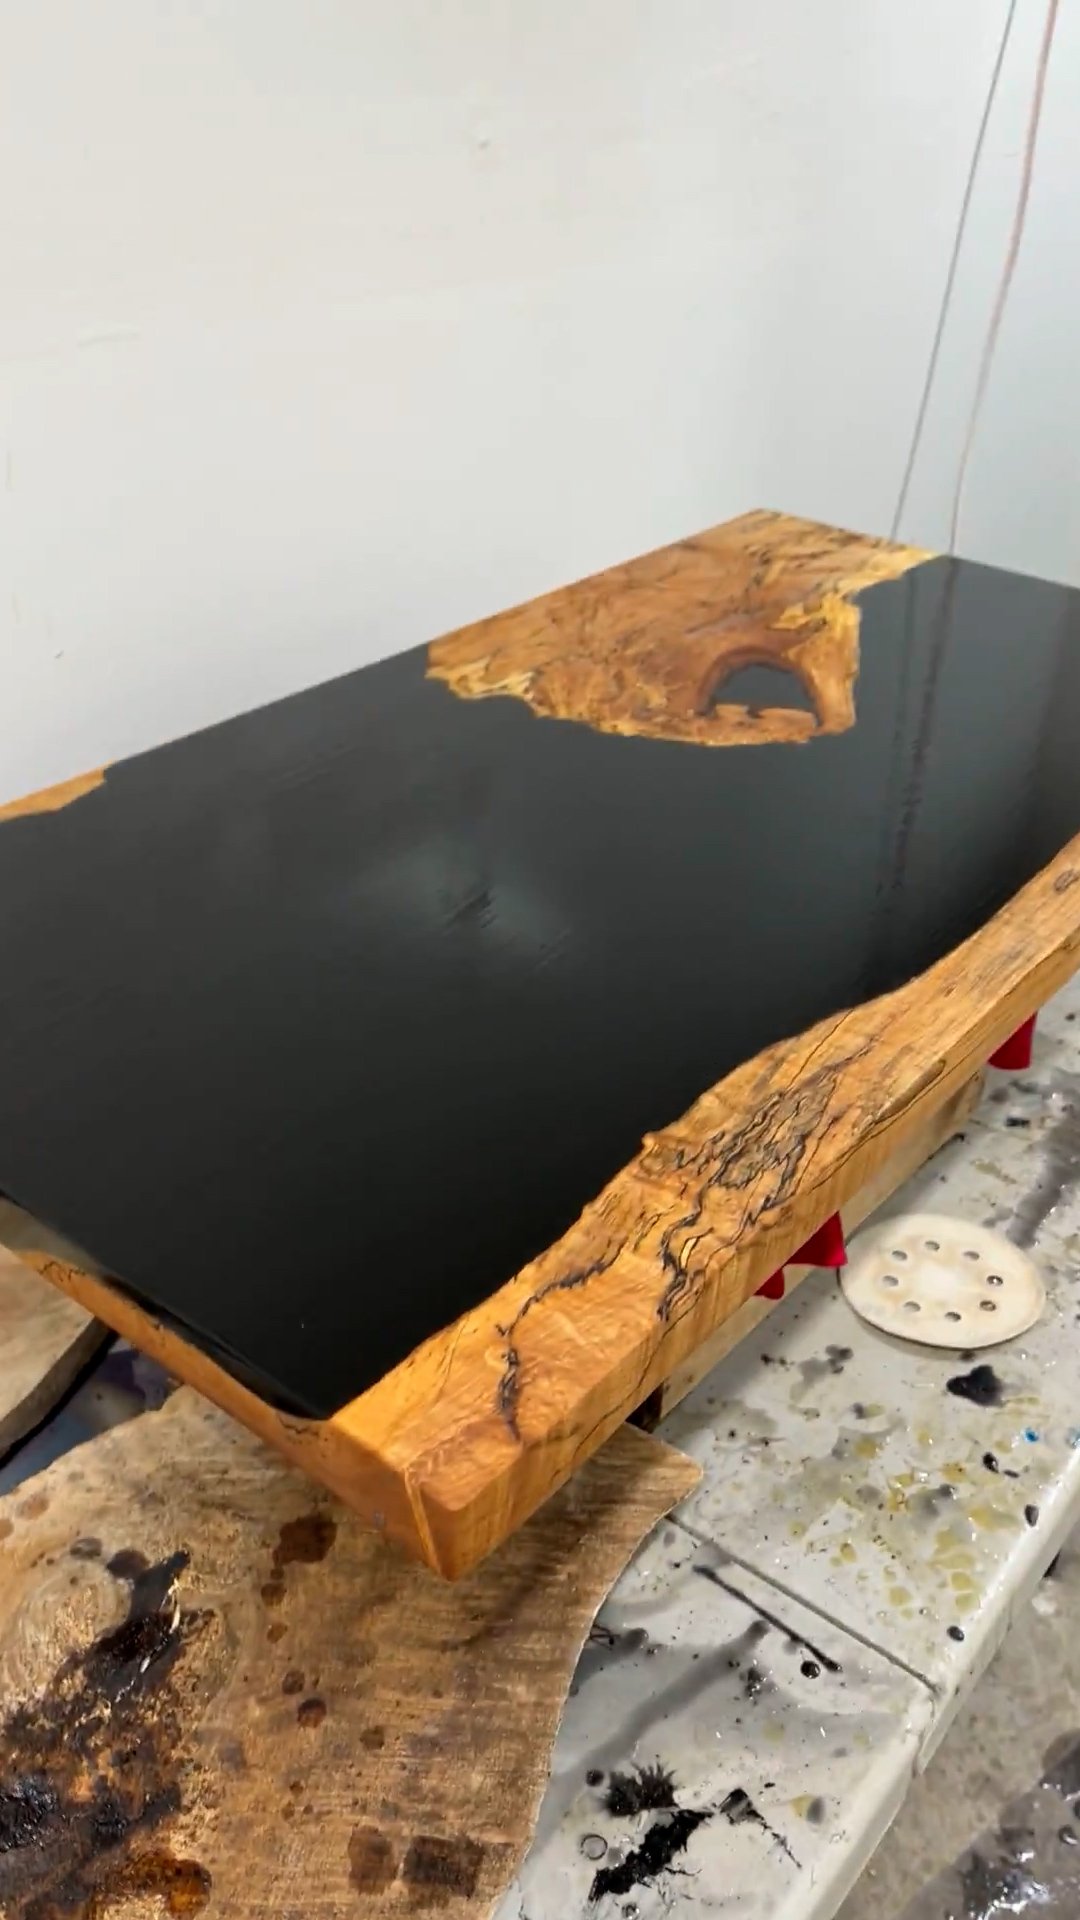
Once the epoxy cured, I popped it out of the mold and used the penetrating epoxy to fill in the last cracks in the wood. After leveling the piece in my drum sander, I began the process of hand-sanding and polishing the tabletop. We secured the four legs to the table afterward, measuring and leveling multiple times to ensure sturdiness. Below, in the gallery, are a few photos sent to us by the client.
This table project was long, and definitely not for the faint of heart, but it certainly was a great deal of fun. Be sure to check out our other projects, including our handmade, personalized fly fishing nets. Don’t forget to like and follow Wayward Trading Post on all social media platforms so you can stay up to date with all the cool projects we’re working on.

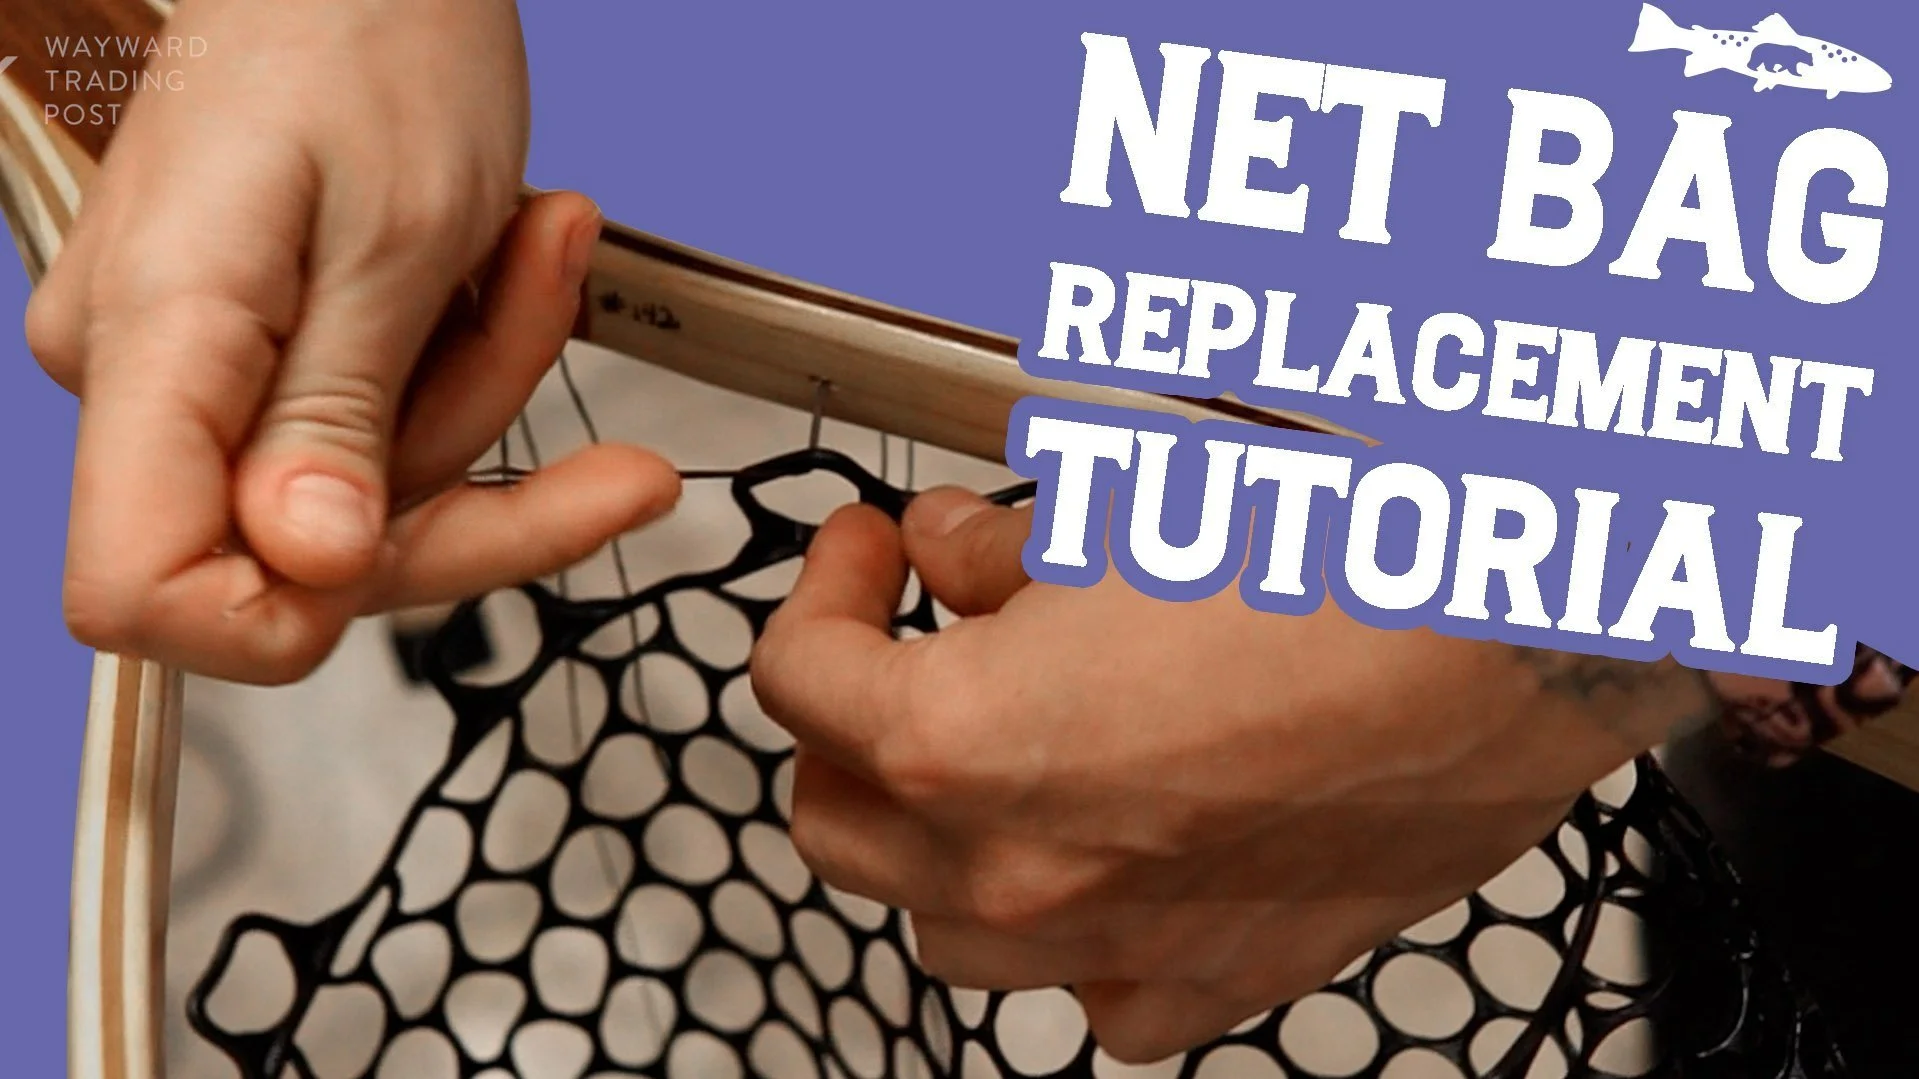
How to replace fishing net bag | clear rubber replacement fishing nets
Many of our customers have asked us to supply our replacement rubber landing net bags. It is often difficult to find a quality fishing net bag so we decided to offer some of our raw materials to the angler community. A common question is how to install landing net replacement bags, so we made a video that can be found on this page. Please look for the “How to Replace Fishing Net Bag” video if you need a helpful step-by-step tutorial.
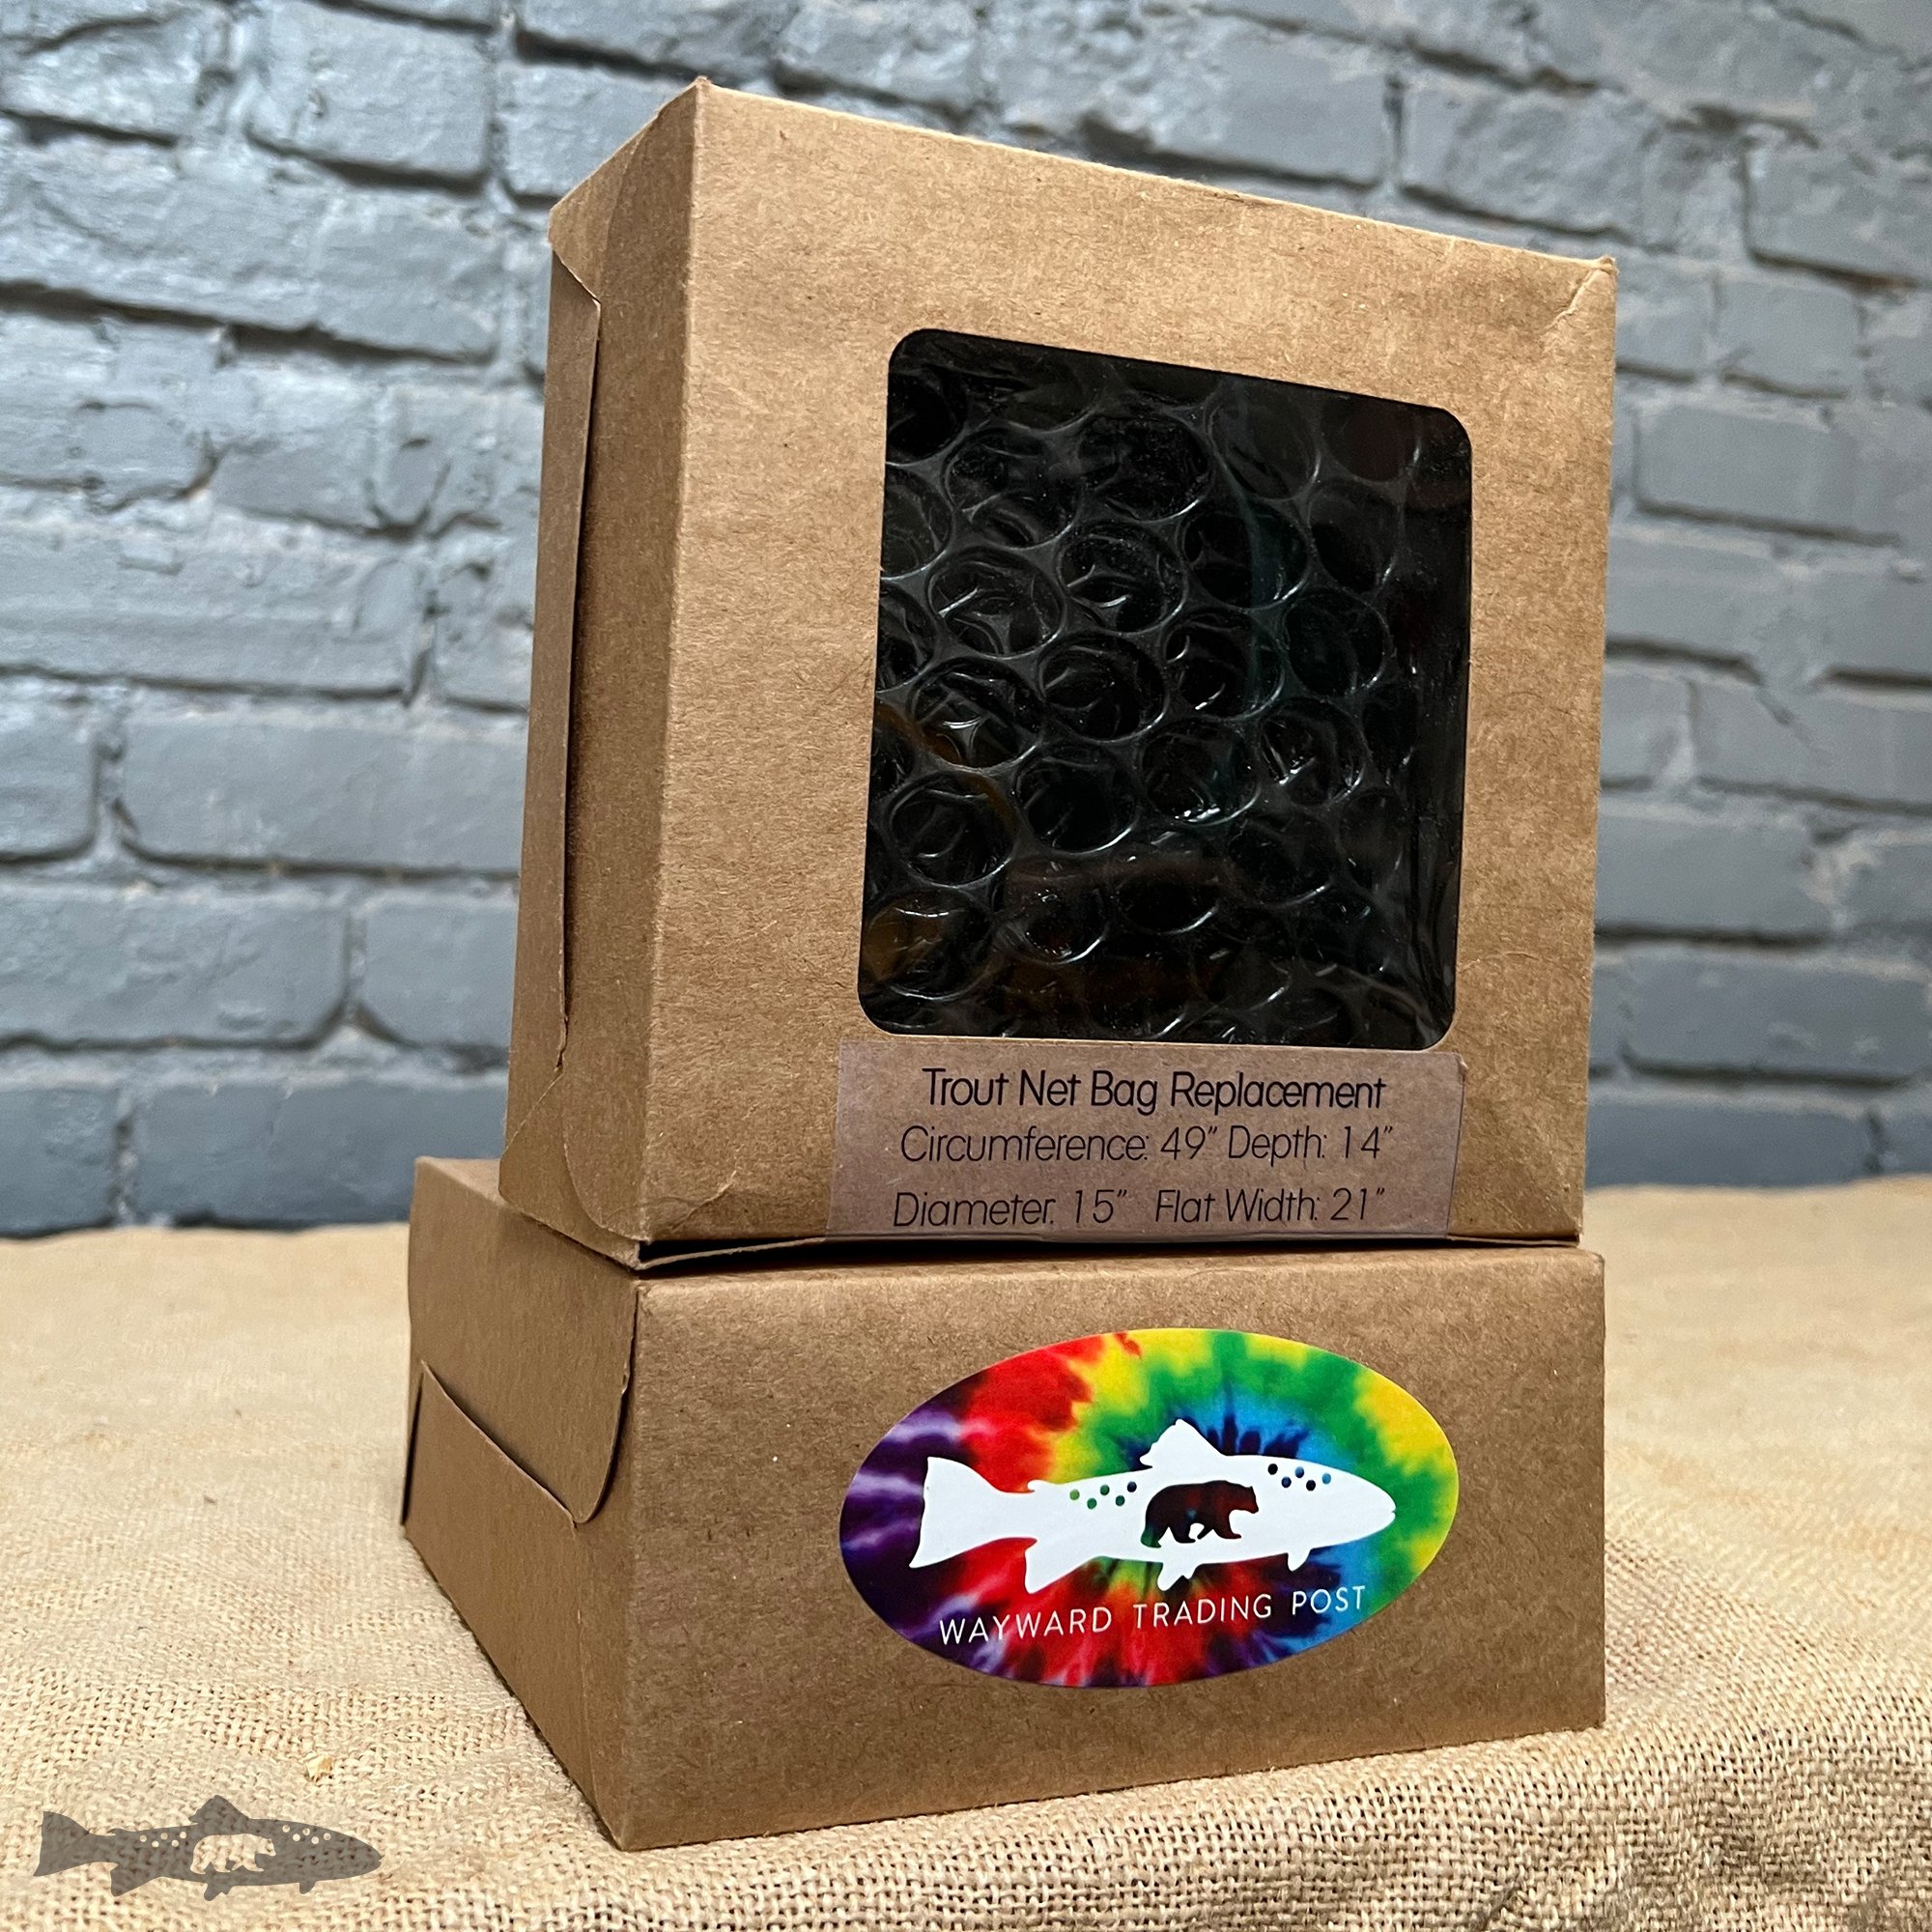
This kit includes a needle, thread, and a video tutorial to walk you through installation. It works on carbon fiber, metal, and wooden nets. These rubber net bags are fish safe and perfect for catch and release.
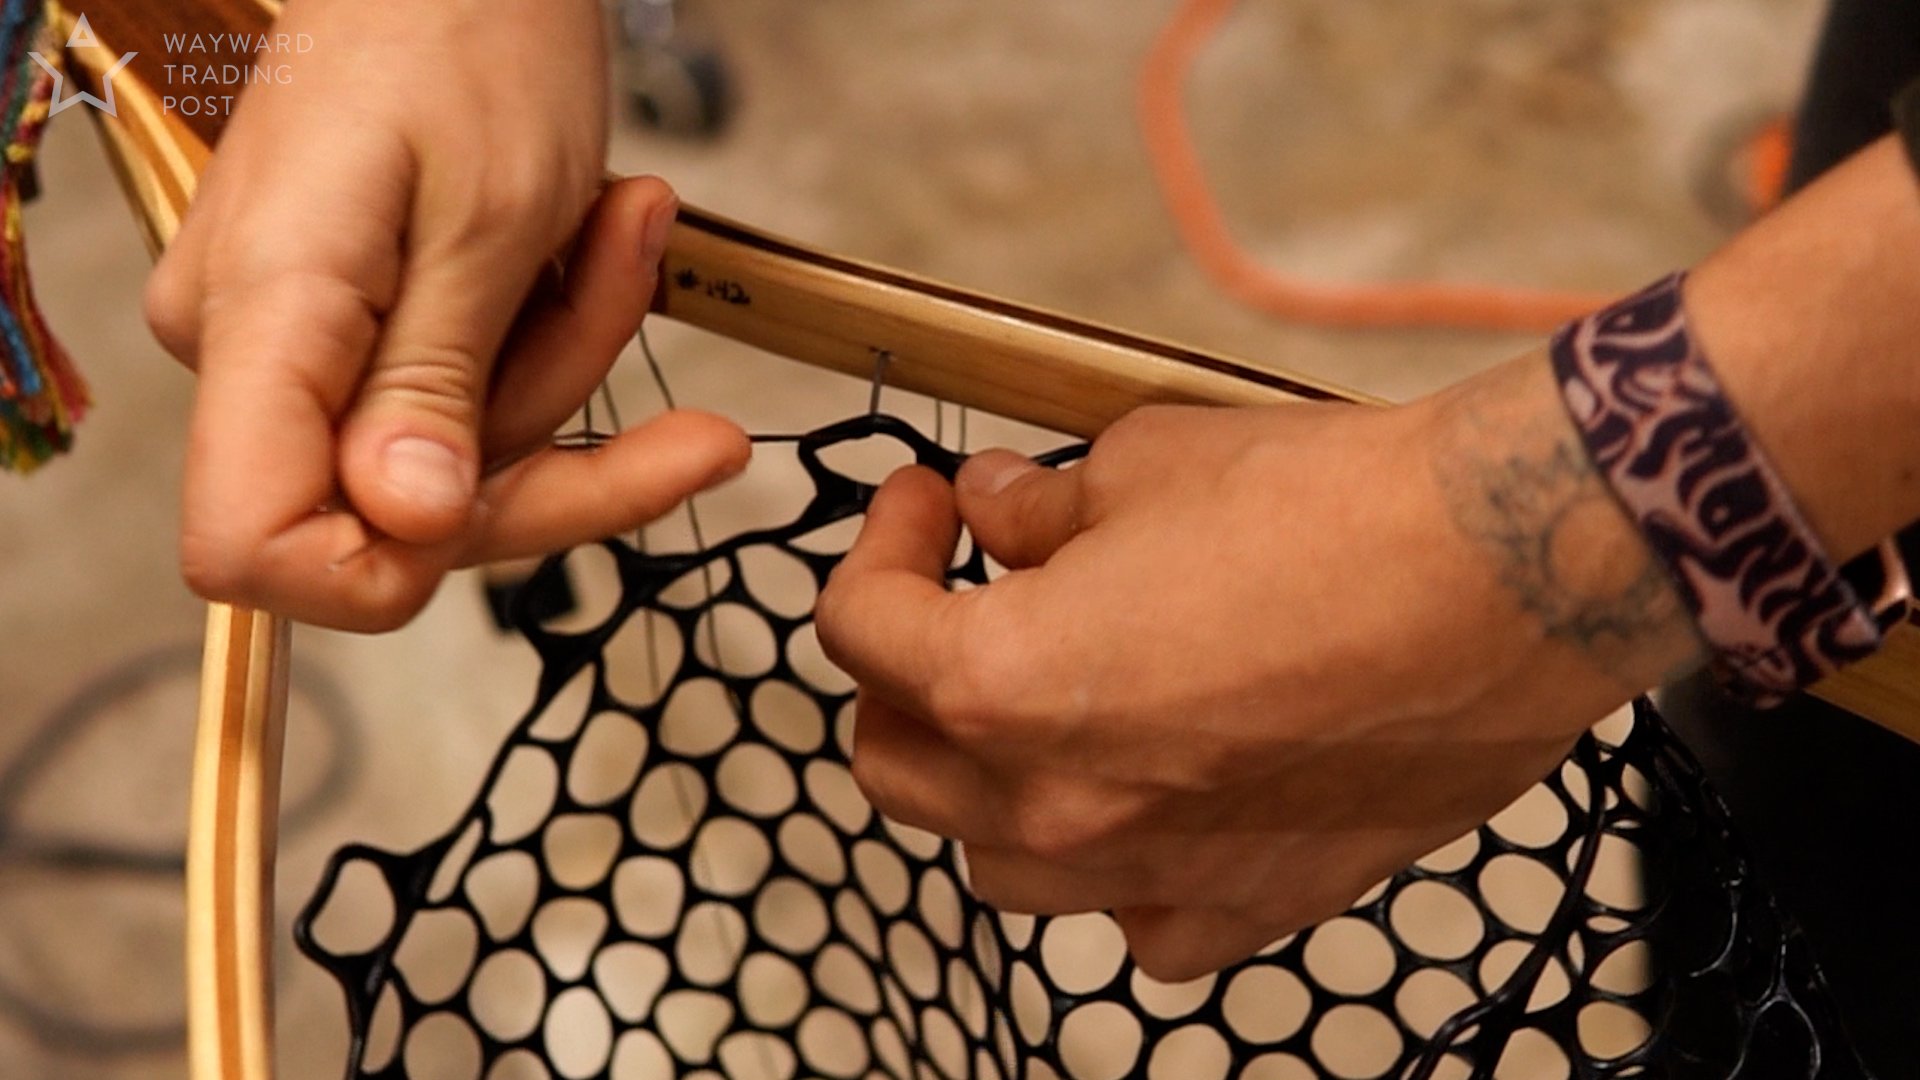
I am going to be walking you guys through a net replacement. Many of our customers have asked us to supply our replacement rubber landing net bags. It is often difficult to find a quality fishing net bag so we decided to offer some of our raw materials to the angler community. A common question is how to install landing net replacement bags, so we made a video that can be found on this page. Please look for the “How to Replace Fishing Net Bag” video if you need a helpful step-by-step tutorial.
This kit includes a needle, thread, and a video tutorial to walk you through installation. It works on carbon fiber, metal, and wooden nets. These rubber net bags are fish safe and perfect for catch and release. If you need to size your kit and bag please use this page to review what sizes are available.
So, we have nets that are silicon. They're all fish-friendly, so they will protect the fish. We have nets that come in both clear and black. We have them for every size of the nets that we sell. And we even have extra-long ones for those who are fishing for steelheads or anything really, really, large. Also, I know a few folks who use them for boat fishing. We also have the Fat Jake in clear and black as well, and then similarly for the Little Dipper. So, when you order a net from us, they will all come in a little box. They will all have thread and needle as well as the fish-friendly net.
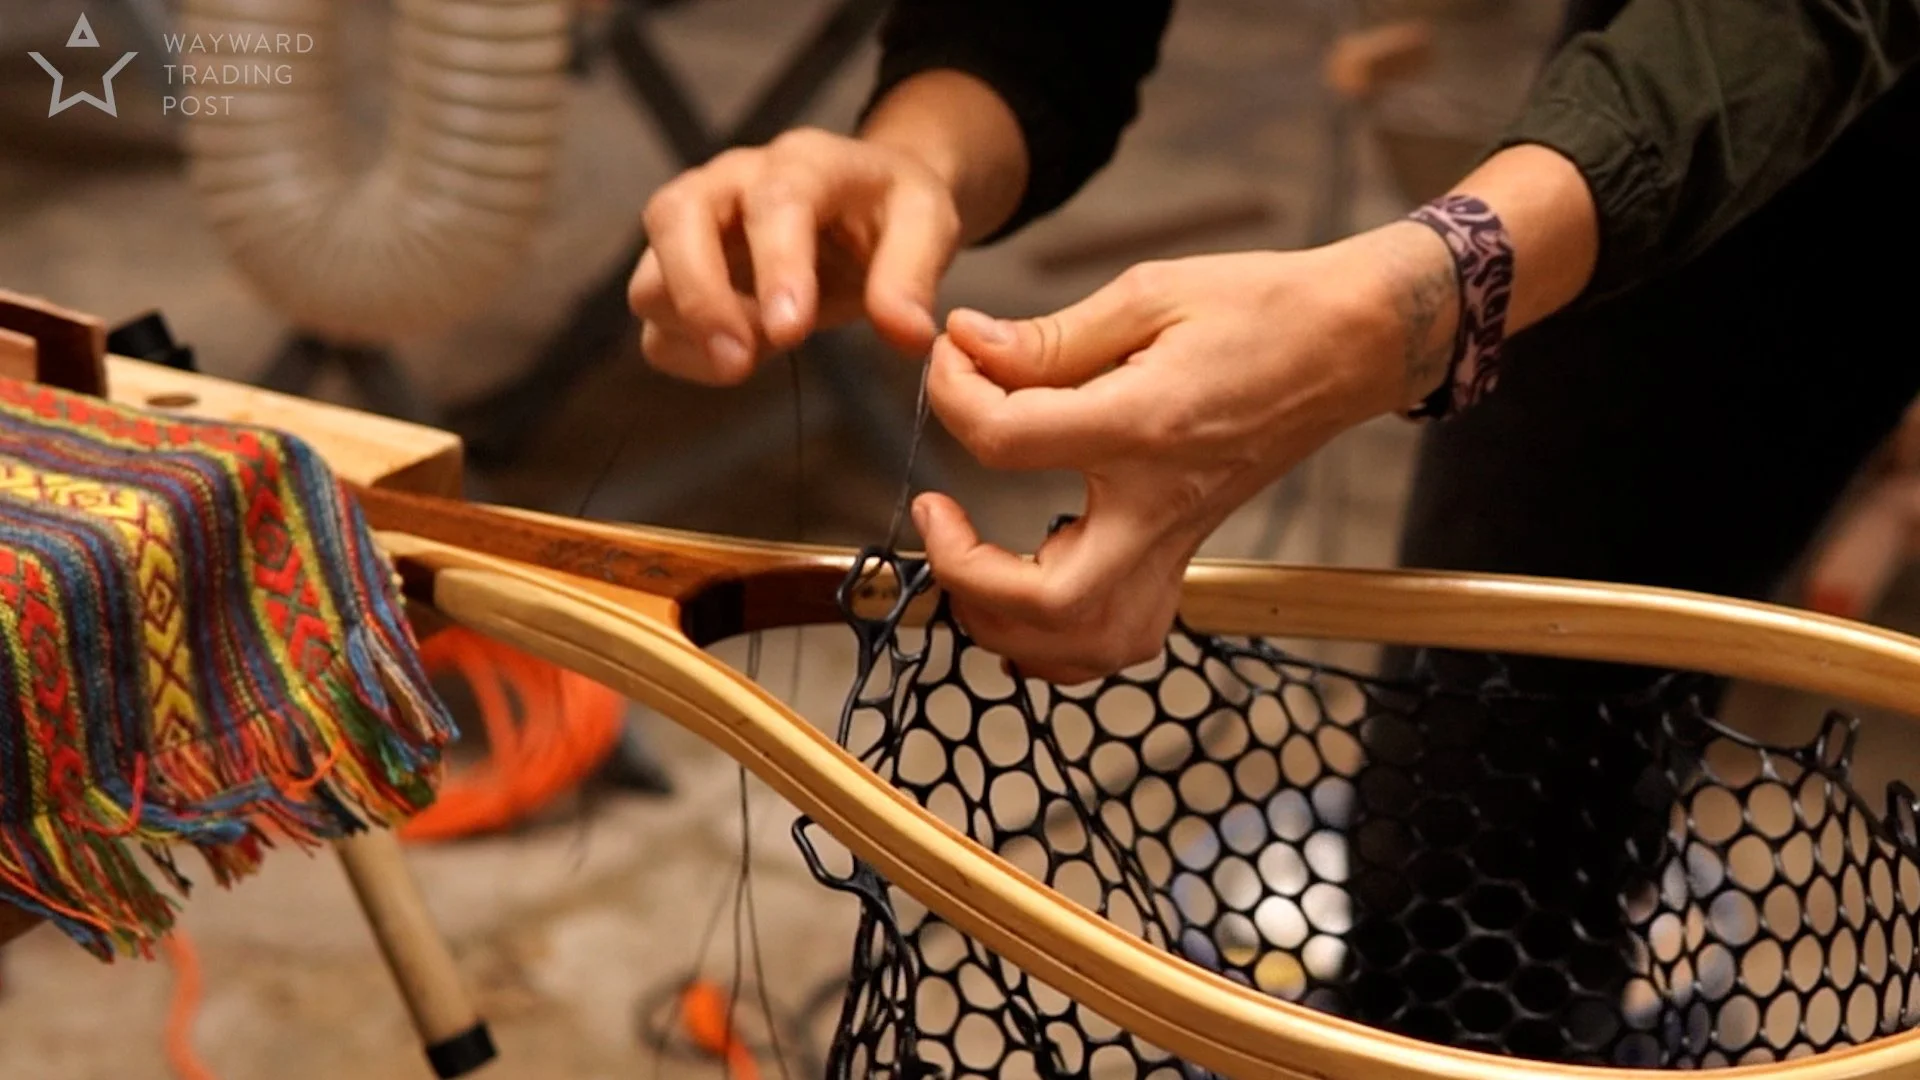
So, today, I just got an order for a classic Fat Jake with a black net, so I'm going to be stringing that up and showing you guys. So, the first thing I do is line up the silicon bag into the hoop. So, I just place it in, identify where we got a hole and clip it on. You can use a variety of different things if you don't have a clothespin. You can use hairclips, rubber bands or whatever you got around.
I just like to do that so it's not all just wiggling around. The next thing I do is take the needle and thread that came with the net, and I usually start here at the end. You just work your way through, in and out of the same hole. The first knot I do, I sort of like to leave a little of the string hanging. So, I'll just take another sort of clip or something to make sure that we have a seal, so this doesn't get away from us. Again, whatever you got around.

So then, you just go into the next hole. So, if you find that your holes aren't lining up to your netting, all you have to do is take a drill bit, 5/64 of an inch, and just drill a new hole. Then, you just take a piece of 120, or you know, you can get even softer 320 sandpaper. Just make sure you go on with your fingertip, really lightly just get rid of some of the raw edging that may come about from putting that extra hole there.
So, they key here is to just go in and out along the line. You want this to look as neat as possible. So, by lining everything up, keeping all of your line in this nice groove, it's gonna look really neat. And then, at the end, we'll put all of the knots in and make sure everything is really clean. So, before we put the knot in, I wanna make sure that the whole bag is secure in there. Not too loose and not too tight. If you do it too tight, you are going to break the silicon just by cutting it off.
So, I usually like to take this, I pull it up to make the knot. Just over, slip it through the piece of thread that is closest to the net right here on the wood. So, you can kind of see it's making the number four. And then, just pull it tight. Now, I like to make a couple of these little knots. They're very clean. But they will not fully secure the net. So, we're going to do about three of these. And then, or maybe four. Make sure it's secure, then just pull it down.
And what you'll start to get is a really long sort of knot like this. At this point, I like to come around and just thread the needle through the lowest point in this little knot that we made. And what that'll do is it'll make it into a little bulge. But that's super clean and we will be able to cut that without it showing at all.
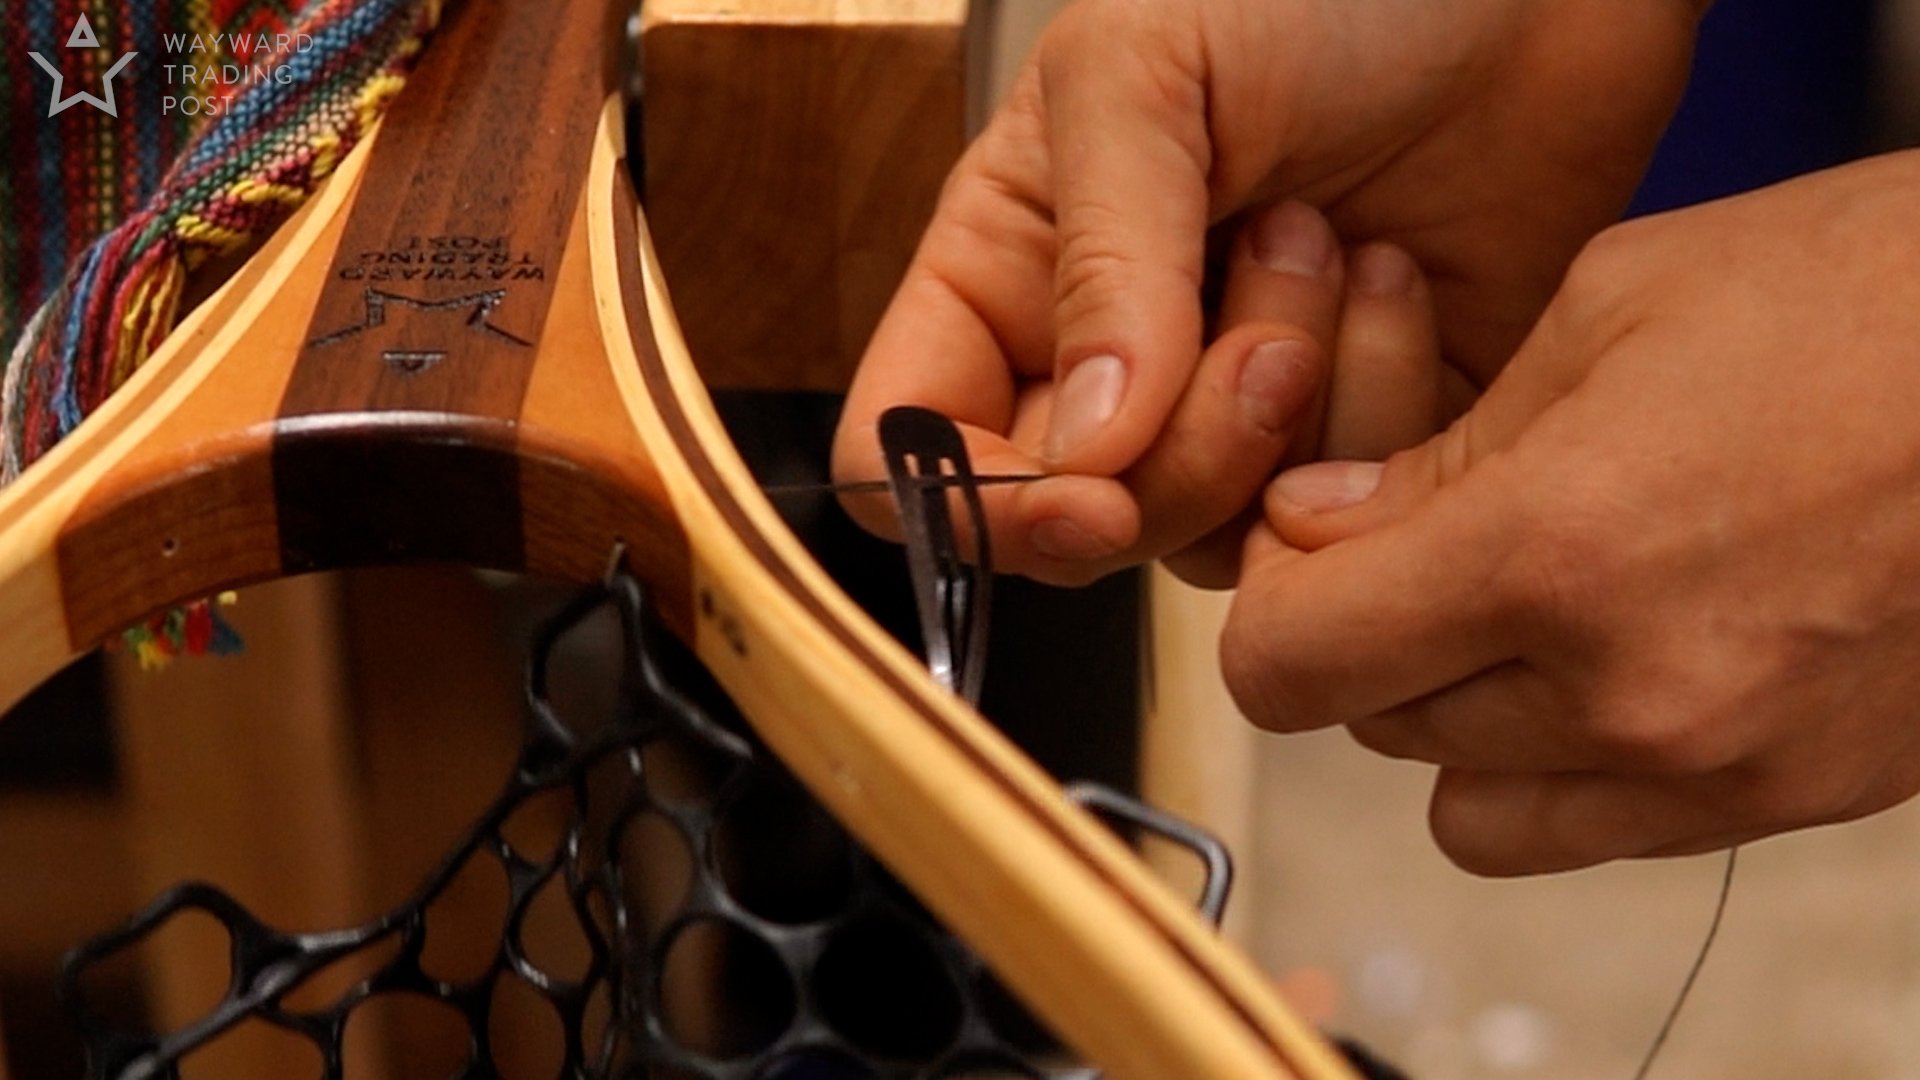
So, I am gonna go to the other side and make sure that this is also secure. So, I give it a little tug to make sure everything's really nice and tight. We don't want any fish flipping out. And then, similarly, I'm going to take this thread and push it through this thread that is closest to the wood and pull. Then, we're just going to make the same knot. So, I like to cut the string as close as possible so that you really don't see it. So, if you look at the top, it's nice and clean. You don't see any of that thread fraying at all, and it's wax-based, so it's not gonna move. It's not going anywhere. If you feel insecure about it, you can go ahead and put a little dab of super glue on it, but I don't really think that you necessarily need it, because this wax is going to grip itself up and we put a heck of a knot in there. So, I'm not terribly concerned that that's going to come out at all. And it looks nice and clean.
So, this package contains everything you need to replace your own net.
Click Here to pick up a Wayward Rubber Netting Replacement Kit
Thanks for tuning in. This is Tina, signing off.
Here is a list of circumferences. https://www.customflyfishingnets.com/landing-net-replacement-bags
Try our custom Net builder https://www.customflyfishingnets.com/
Instagram https://instagram.com/waywardwoodshop?utm_medium=copy_link
Facebook https://www.facebook.com/groups/flyfishingaddicts/permalink/986107435519176
Feel free to call or email if you have any order increase inquiries
Phone (610) 638-2991
email info@wywardtradingpost.com

Man's Best Friend on a Wood Fly Fishing Net
Jason Rodgers wanted me to turn one of our custom wood fly fishing nets into a personalized homage. Jason first came to us and asked for a handcrafted trout net with an eagle on the throat, and apparently, his son caught wind that his dad had a nicer landing net than he did. So when his birthday came around Jason decided to surprise him with something special.
Jason Rodgers wanted me to turn one of our custom wood fly fishing nets into a personalized homage.
Jason first came to us and asked for a handcrafted trout net with an eagle on the throat, and apparently, his son caught wind that his dad had a nicer landing net than he did. So when his birthday came around Jason decided to surprise him with something special.
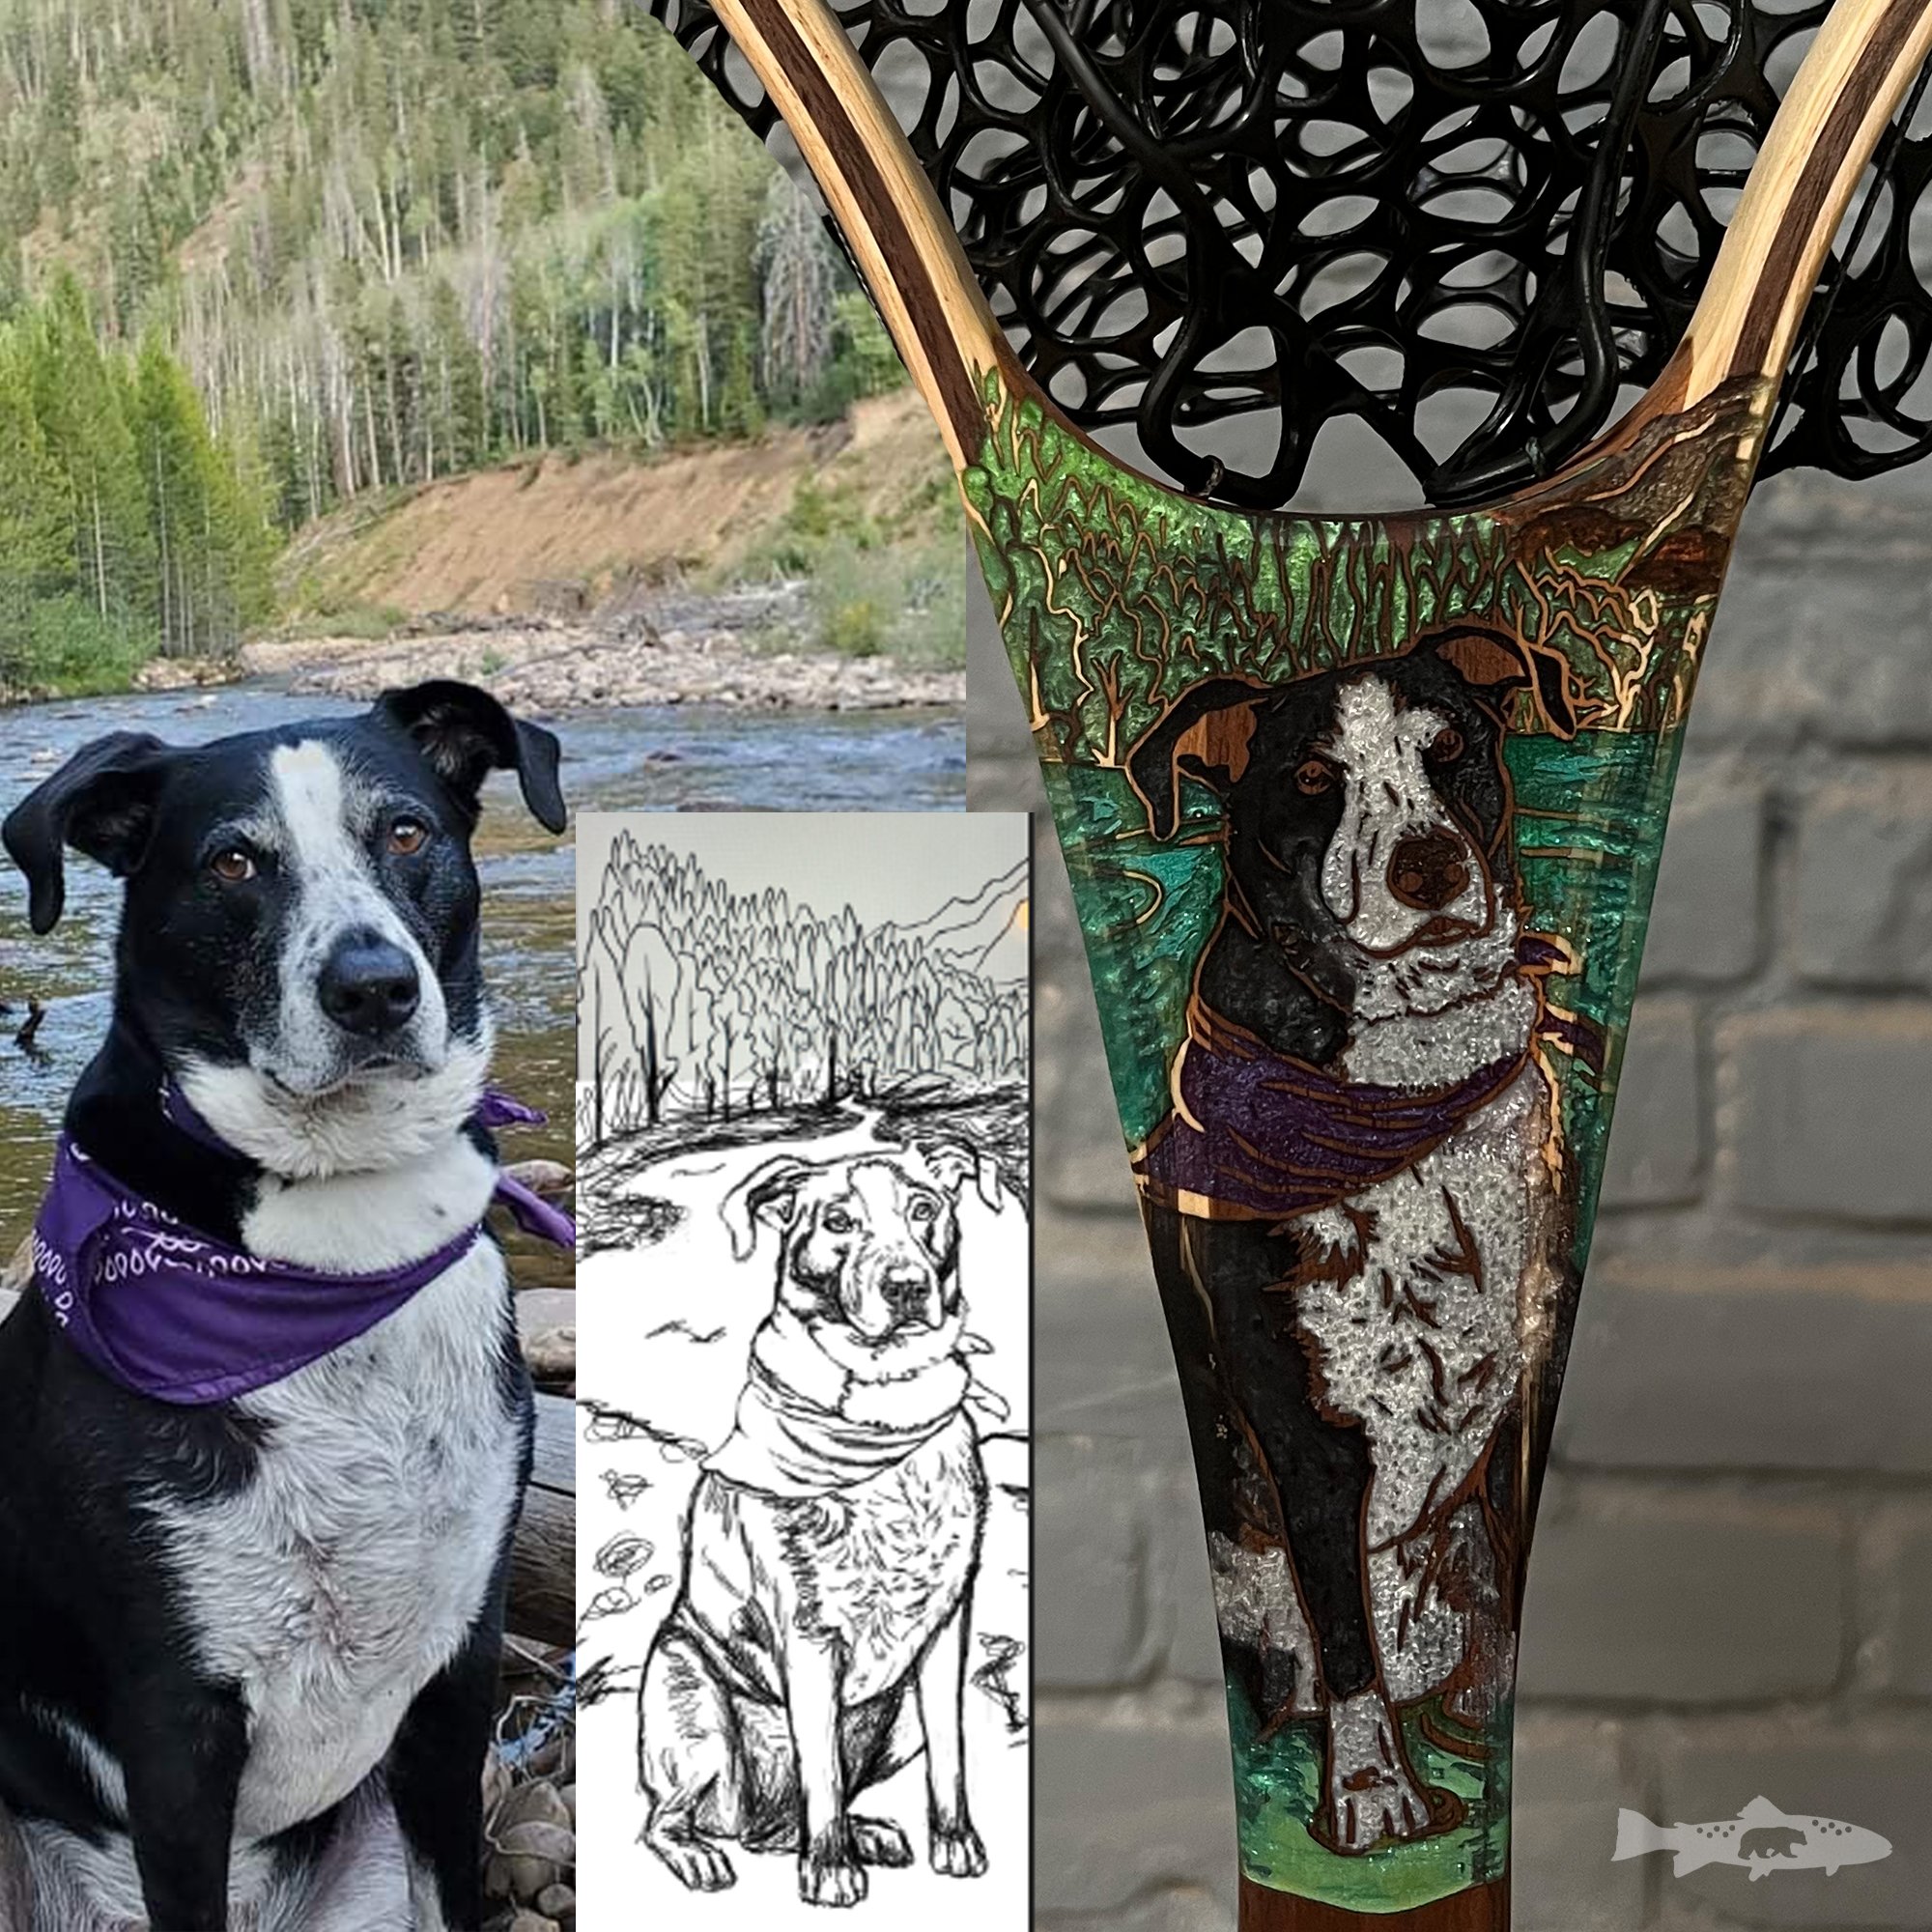
All of our handcrafted wood landing nets are made right here in Pennsylvania. This particular model is called a Fat Jake and it is made out of Walnut, Cherry, and Hickory. Once the net was shaped, and ready for a final sanding we pulled it out of the normal production cycle so we could do the artwork.
As with a lot of us, our dogs are our best friends. We have a little one-eyed shop dog that runs around with us all day long, so we get it. The first step in the epoxy portrait process was to hand sketch the dog so I could cut out the spaces for the epoxy. We use Total Boat Epoxy and mix in various pigments to create the various colors. This project had a really noticeable purple element in it so I did a couple of test colors to make sure that would pop!

Epoxy needs a few days to cure and then it is back to the sanding desk where the artwork gets polished. The process from there is pretty much the same as every other landing net. We coat the wood and epoxy parts so that they are waterproof and ready for the river.

If you have any questions about how to get your own custom fly fishing net to feel free to call the woodshop at (610) 639-2991